Aerogarden Ultra CFL bulb modification
Aerogarden Ultra CFL bulb modification
I enjoy growing vegetables and especially hot peppers. I find the sheer number of different strains and their specific characteristic fascinating. Unfortunately, the growing season is somewhat short in Montréal and wanted to extend it by growing them inside during winter. My first idea was to build my own hydroponic system which wouldn't have been that hard but then I kept talking about it and my girlfriend ended up getting me an Aerogarden ultra for Christmas. At first I wasn't sure that the Aerogarden's light would be sufficient to grow hot peppers and searching on google did not bring me any confirmation that the light would be sufficient to bring fruit to maturity. I decided to try nonetheless and managed and planted some Moruga pepper from Trinidad and Tobago. It was a success and I harvested peppers for a few months until the day that my 3 Aerogarden proprietary CFL light bulb got too weak for the plants. I had bought some backup light in apprehension of that moment but to my surprised I realized that it was not the right type for this Aerogarden's model (they have 3 different types). Faced with the prospect of ordering expensive proprietary light, paying over 20$ shipping to Canada and an already dead plant, I decided it was the perfect time to modify the hood of the system to accept regular CFL light bulb. As long as you take the proper light spectrum for photosynthesis, they would perform just as well if not better than the stock one. Plus they will be cheaper and easily available anywhere locally. You'll also be able to mix and match spectrum depending of the state of vegetation of your plant if you choose to do so.
You'll need the following item to do this modification:
Light bulb socket
3
CFL Light bulb
3
120v Relay
1
Old appliance cable with plug
1
You'll also need some 16 AWG electrical wire (don't use smaller wire, it could be dangerous), electrical tape and the basic tool like screwdrivers, soldering iron and, of course, solder.
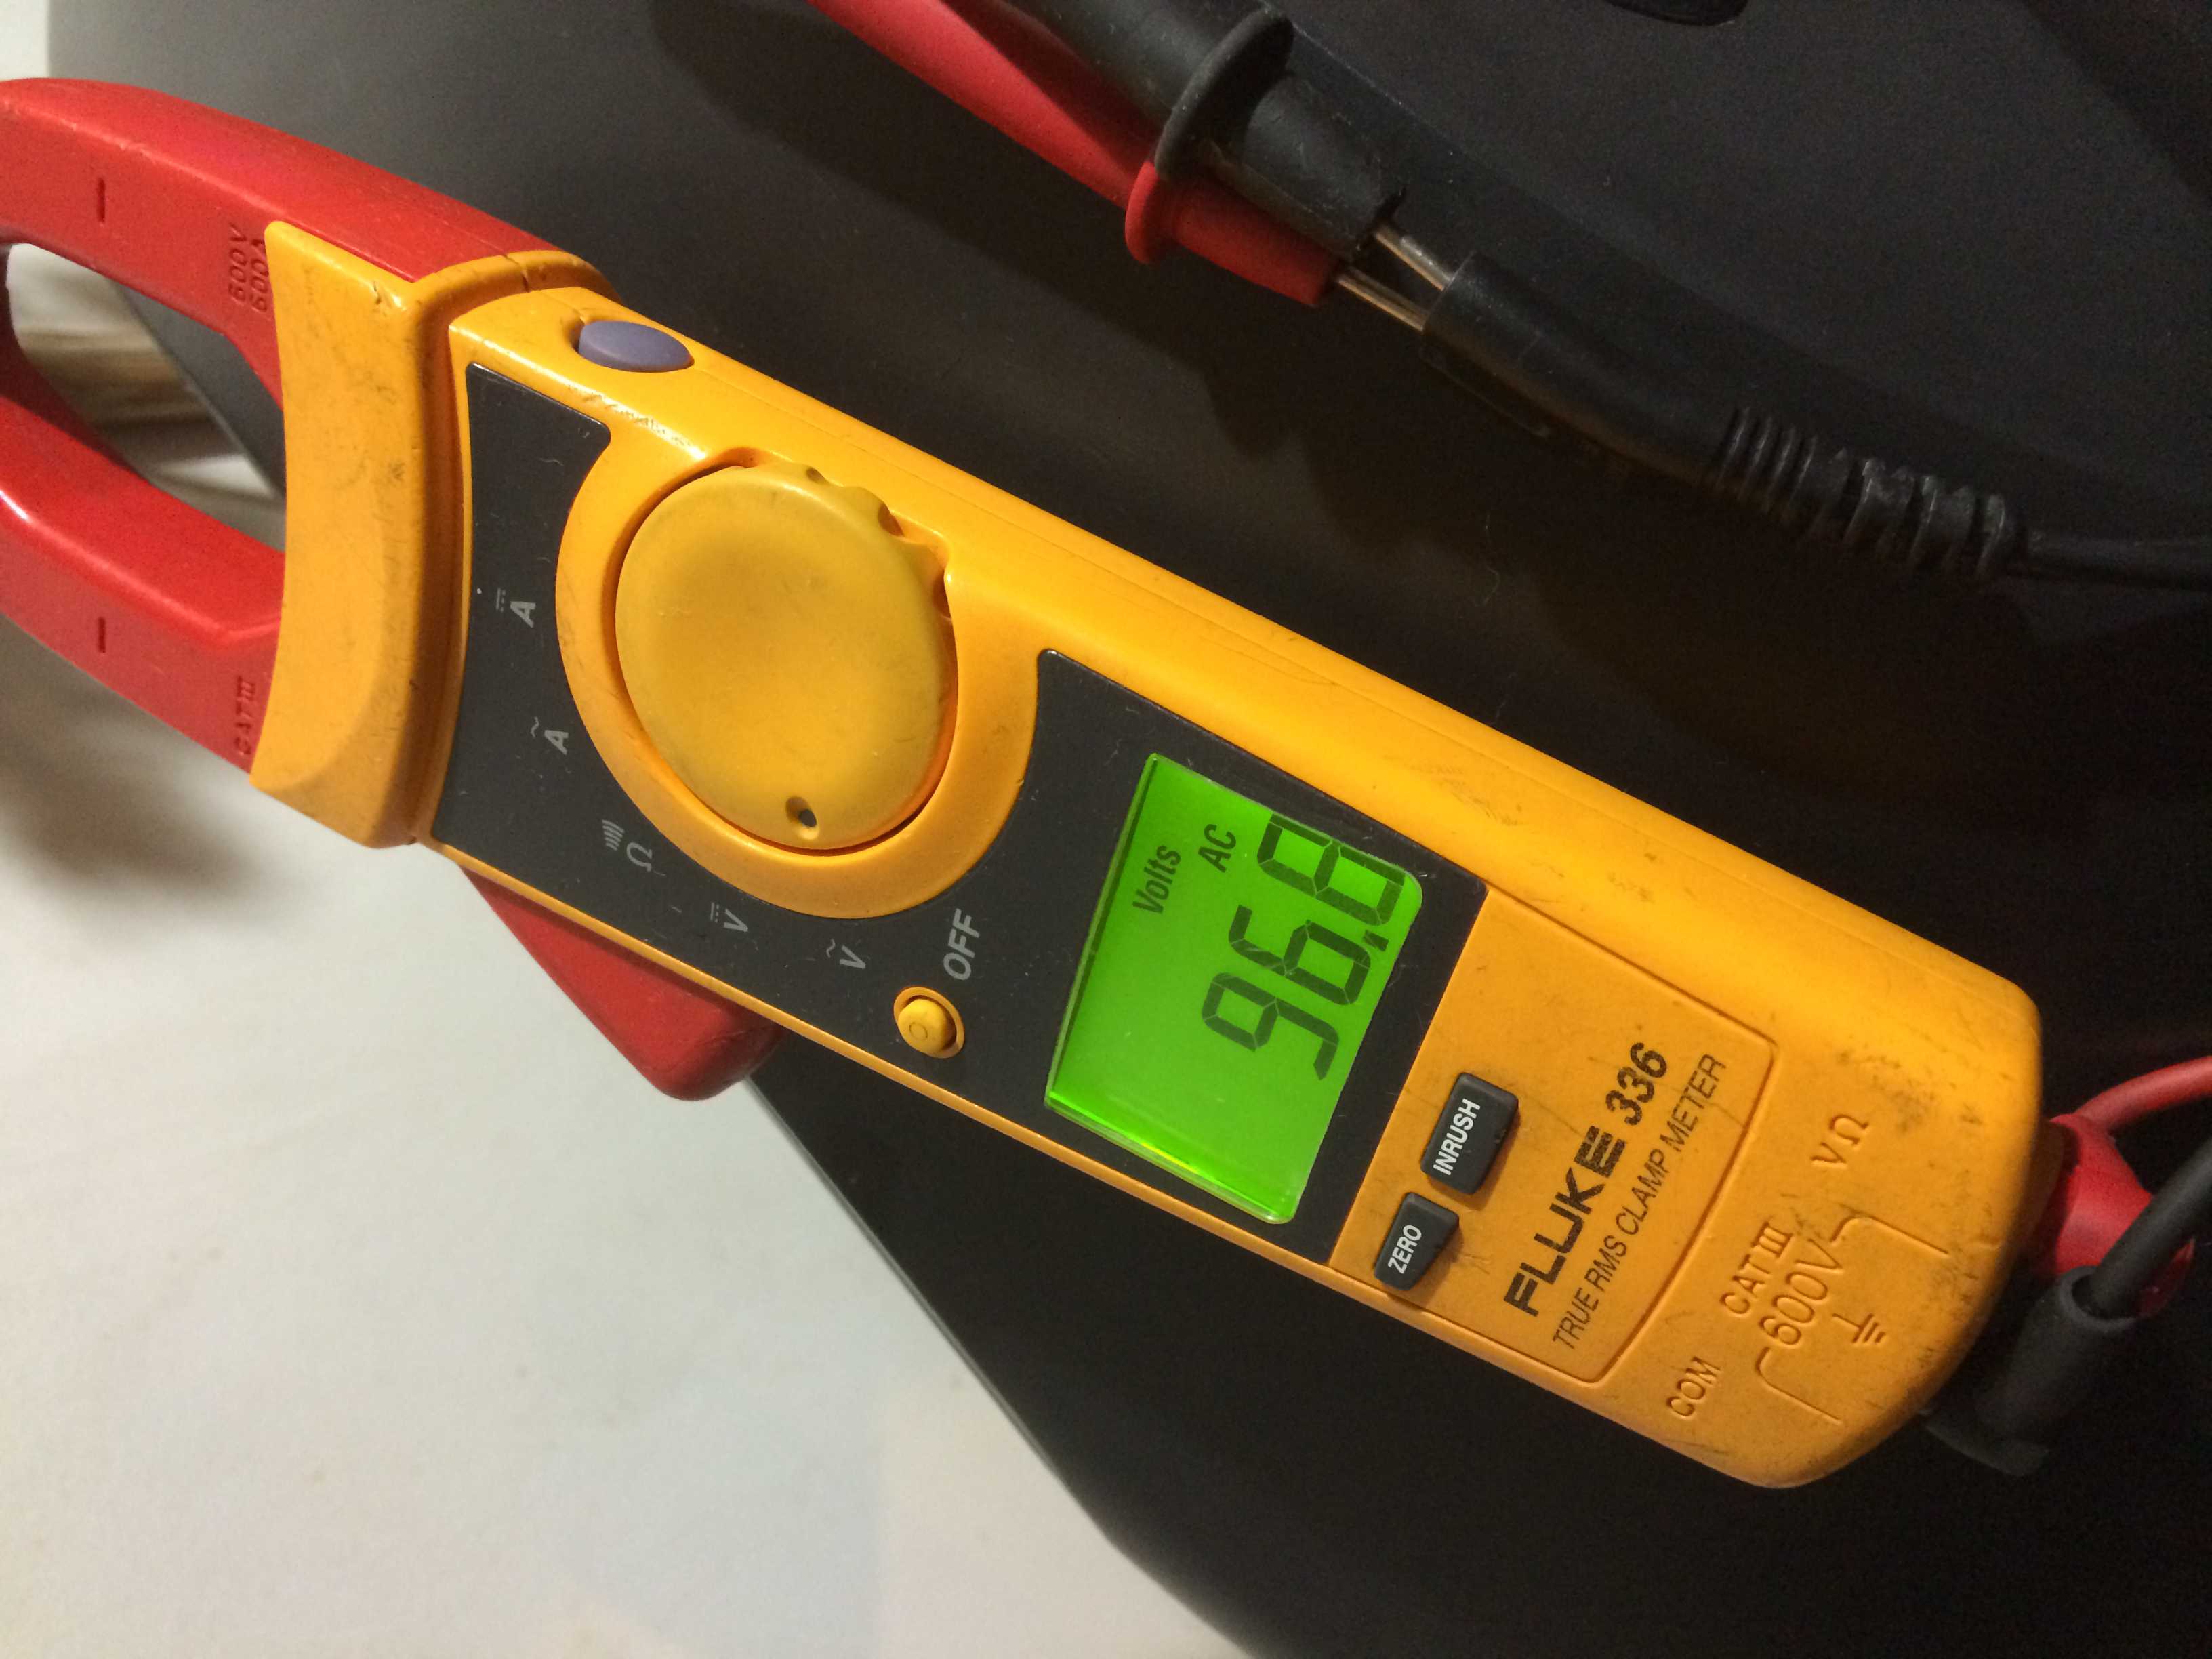
I found many forum posts and guides online to modify the Aerogarden's hood but none were for the Aerogarden Ultra so I started unscrewing the hood and checking out how I would do it. At first, I thought that it would be a matter of drilling bigger hole, fixing new sockets and wiring them to the plug but it turned out not to be as straight forward. I took some measurement and while the Aerogarden supply to the canopy was 120v, the light bulb connector was not getting 120v like I was expecting. I suppose it got to do with the lamps not having the ballast inside their bases but in the Aerogarden's hood instead to save costs. So just swapping the proprietary connector for regular light bulb socket was out of the question. Another potential issue was that the Aerogarden seem to be outputting about 90v to the hood even when the timer is off.
While it might have not created issues with the light bulbs, under powering electronics for an extended period of time is never good and probably would have reduced the life of the light bulbs. I also wanted to be able to use more powerful bulbs and I wasn't sure how much watts the Aerogarden was designed for. Connecting the new bulbs straight to a new separate power source would have obviously solved all those issue but I didn't want to have a separate timer for the new light bulb and wanted the light to go ON and OFF automatically using the Aerogarden built in timer so I decided to go with a simple electromechanical relay.
For those who are not aware of what relays are, I'll attempt to explain them simply. If you know what they are, skip ahead. Electromechanical relay are simply an assortment of NC and NO contacts (or switch if you prefer) varying from one to a dozen and an electromagnet. When the relay receives a specific current, it energizes the coil creating a magnetic field which pulls the plate to the opposite position. If the switch was NC (Normally Closed), it will open and if it was NO (Normally Open) it will close. So instead of you manually flipping a switch, they get flipped automatically when the relay detect the current it was designed for. It's very useful for any kind of automation task because you can open or close multiple separate circuits all at once without physical intervention and you can also control high voltage circuit with a very small current(micro-controller output for example). I chose to use an electromechanical relay but you could also use a solid state relay. They work in the same way but they use no moving part and do not produce the typical ''clack'' noise associated with regular electromechanical relay.
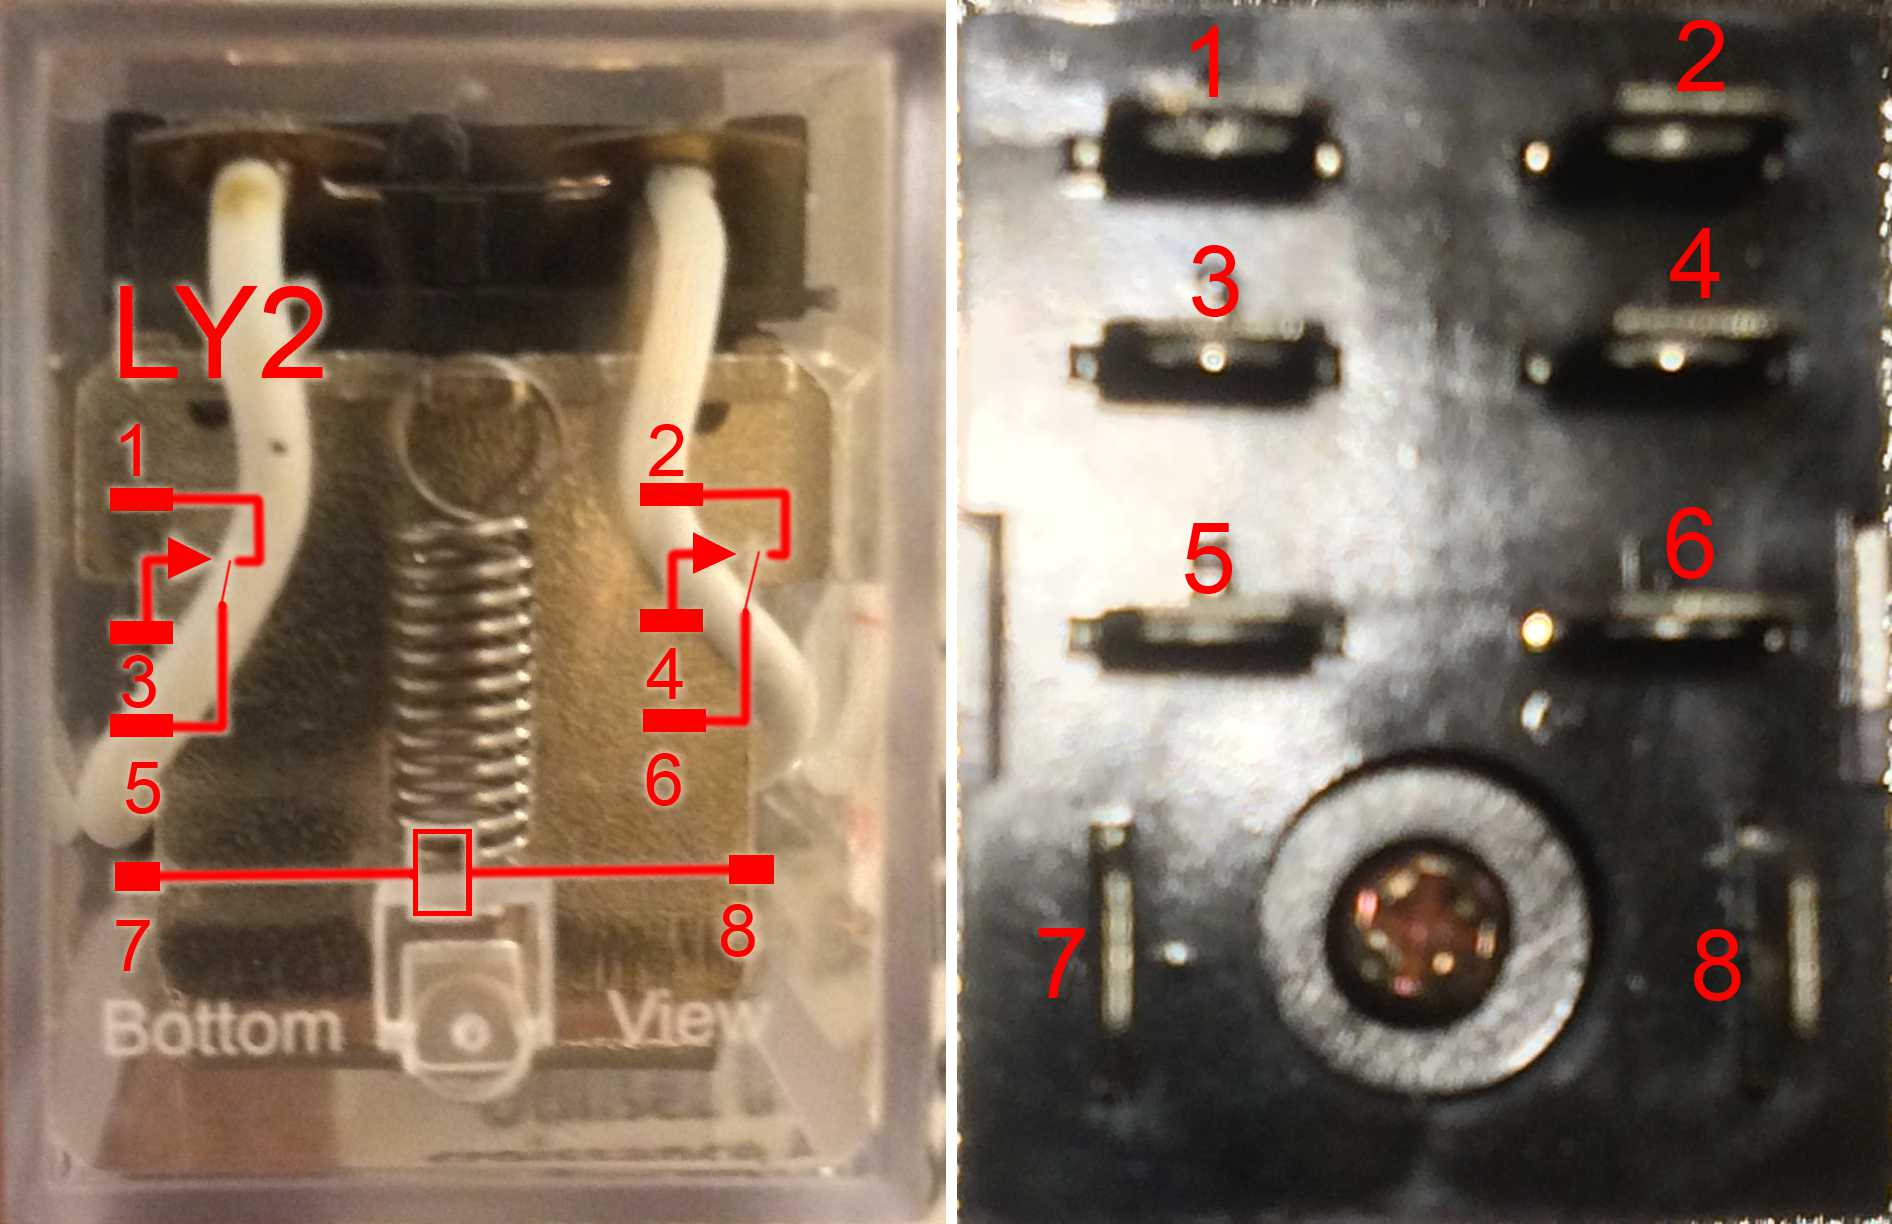
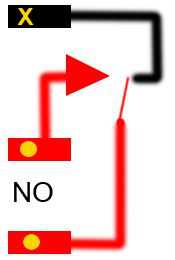
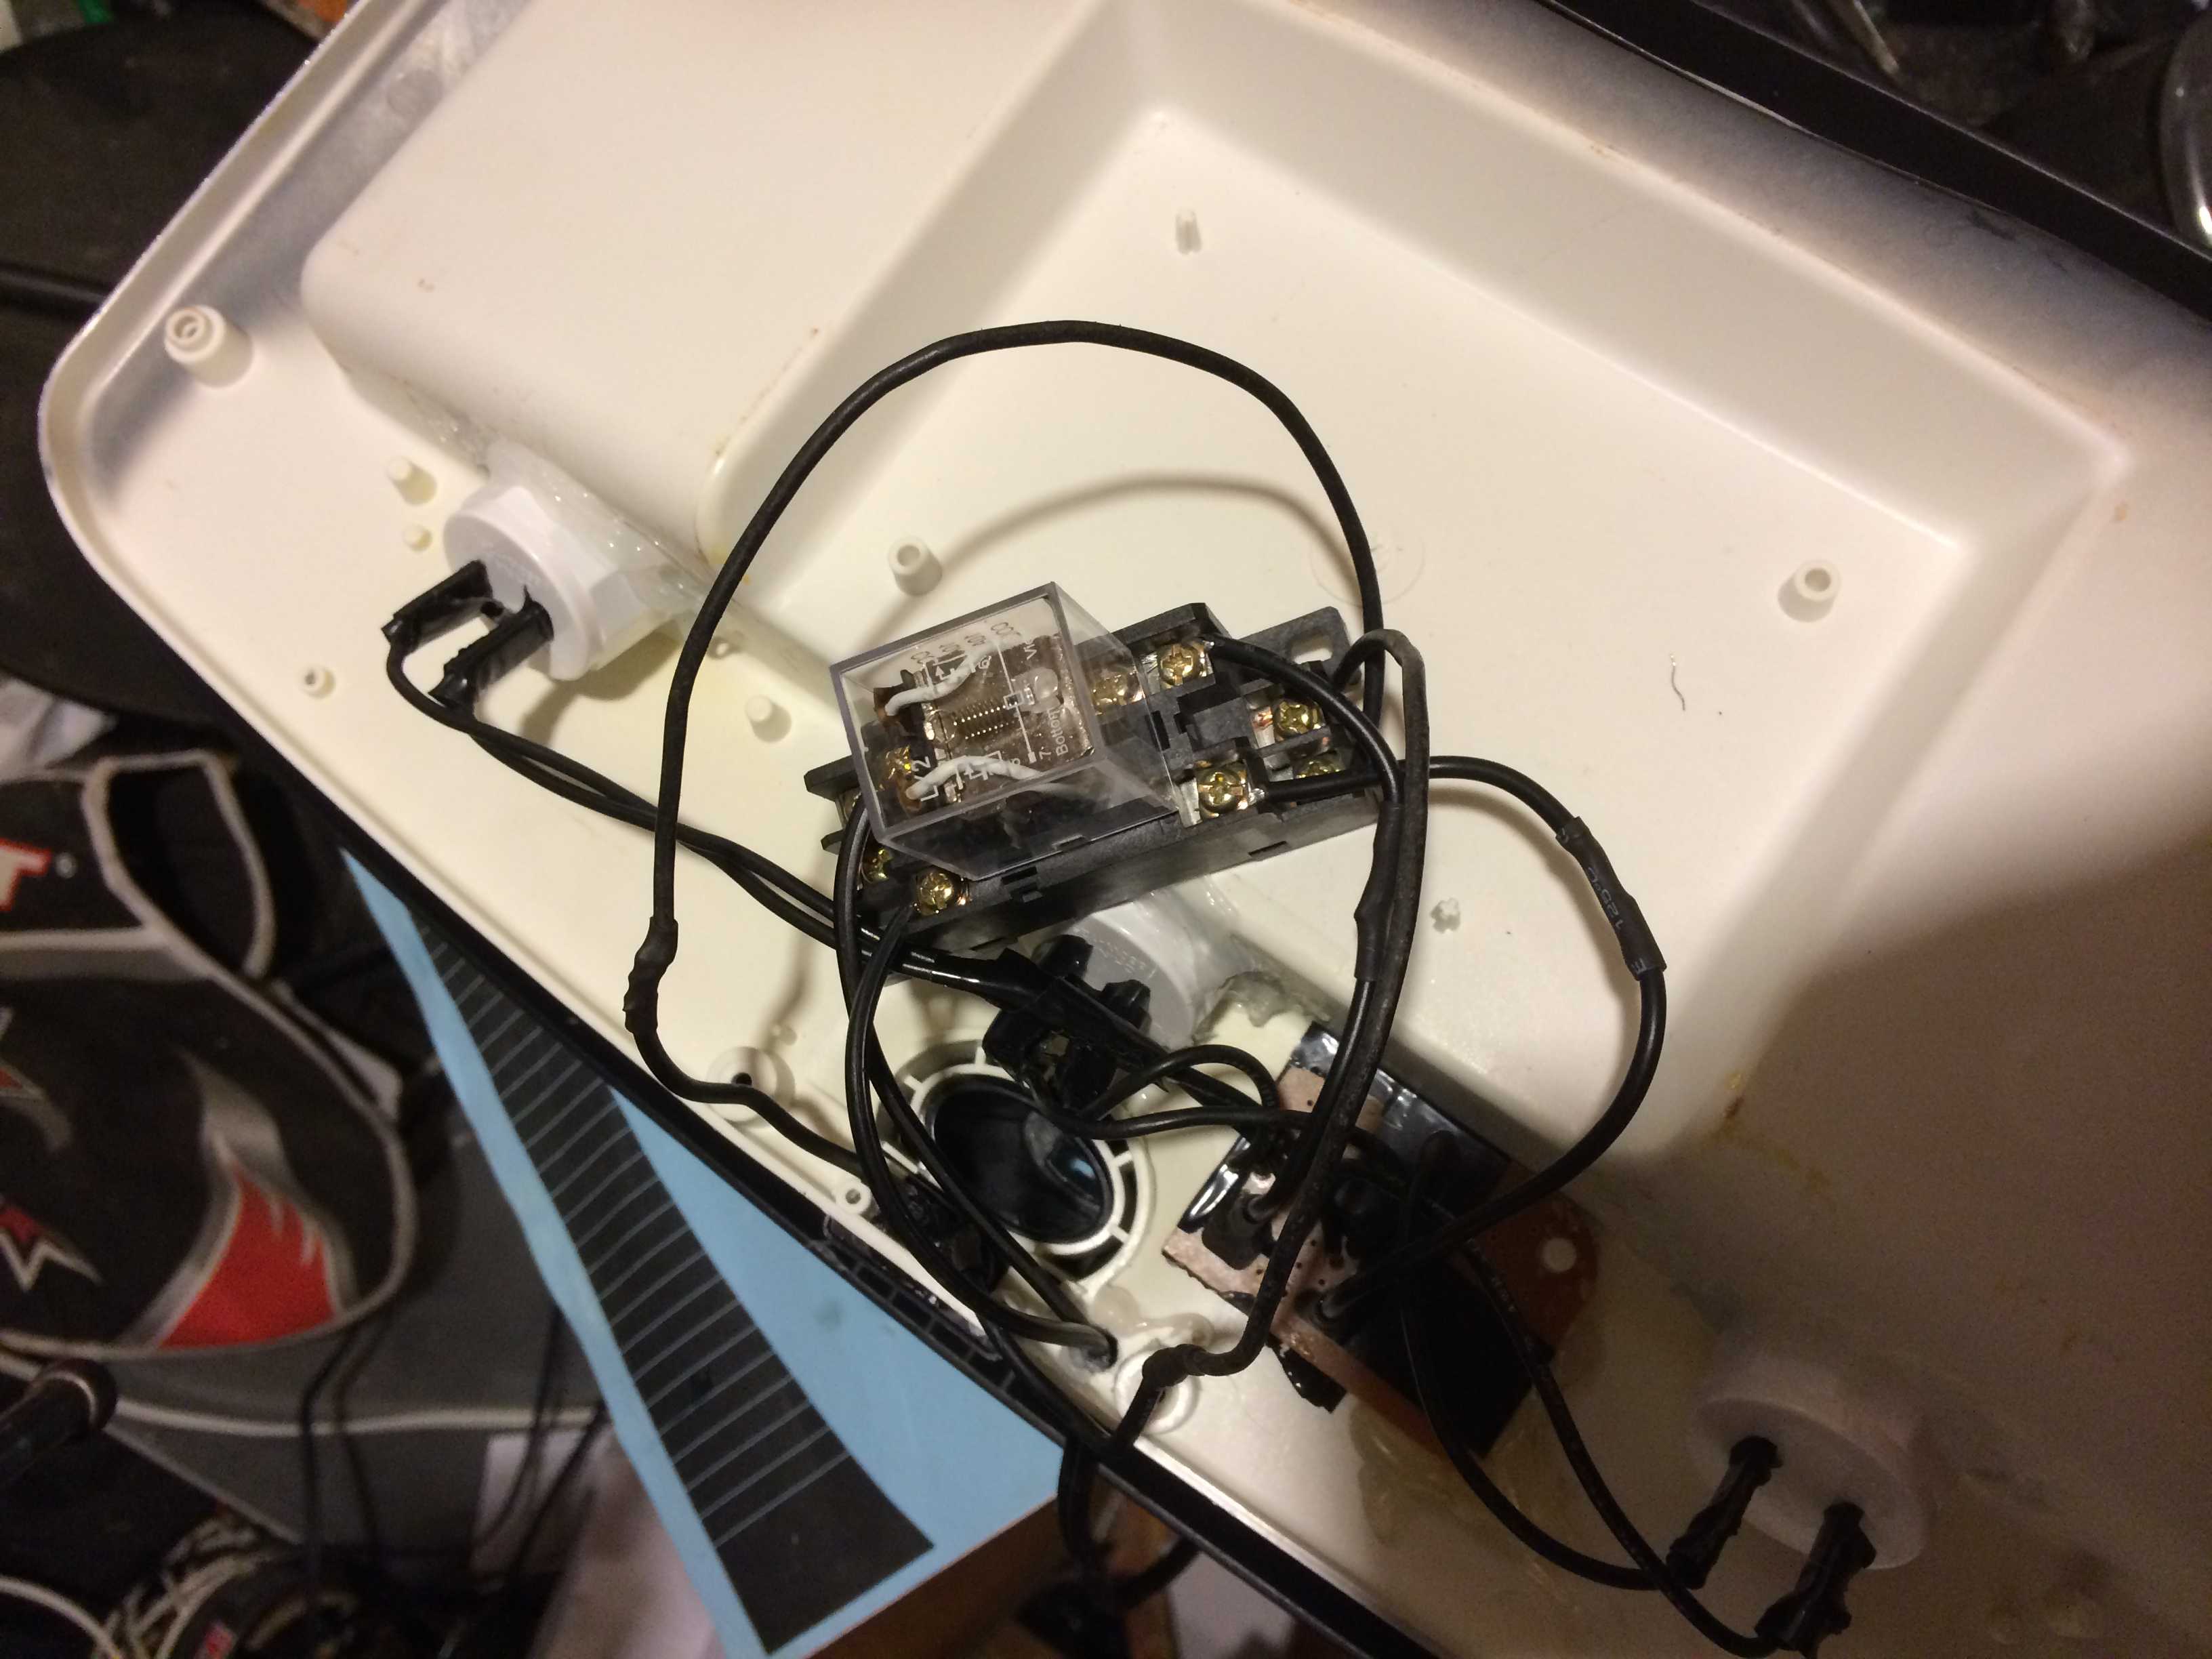
Your relay might differ from the one I am using, but the only thing that matter is whether it is controlled with 120V AC and that you have at least one NO contact.
The red part of the following picture is showing which pole of the contact are NO. This is the poles where you need to connect your wires to as it will be closing once the control voltage will be fed into your relay.
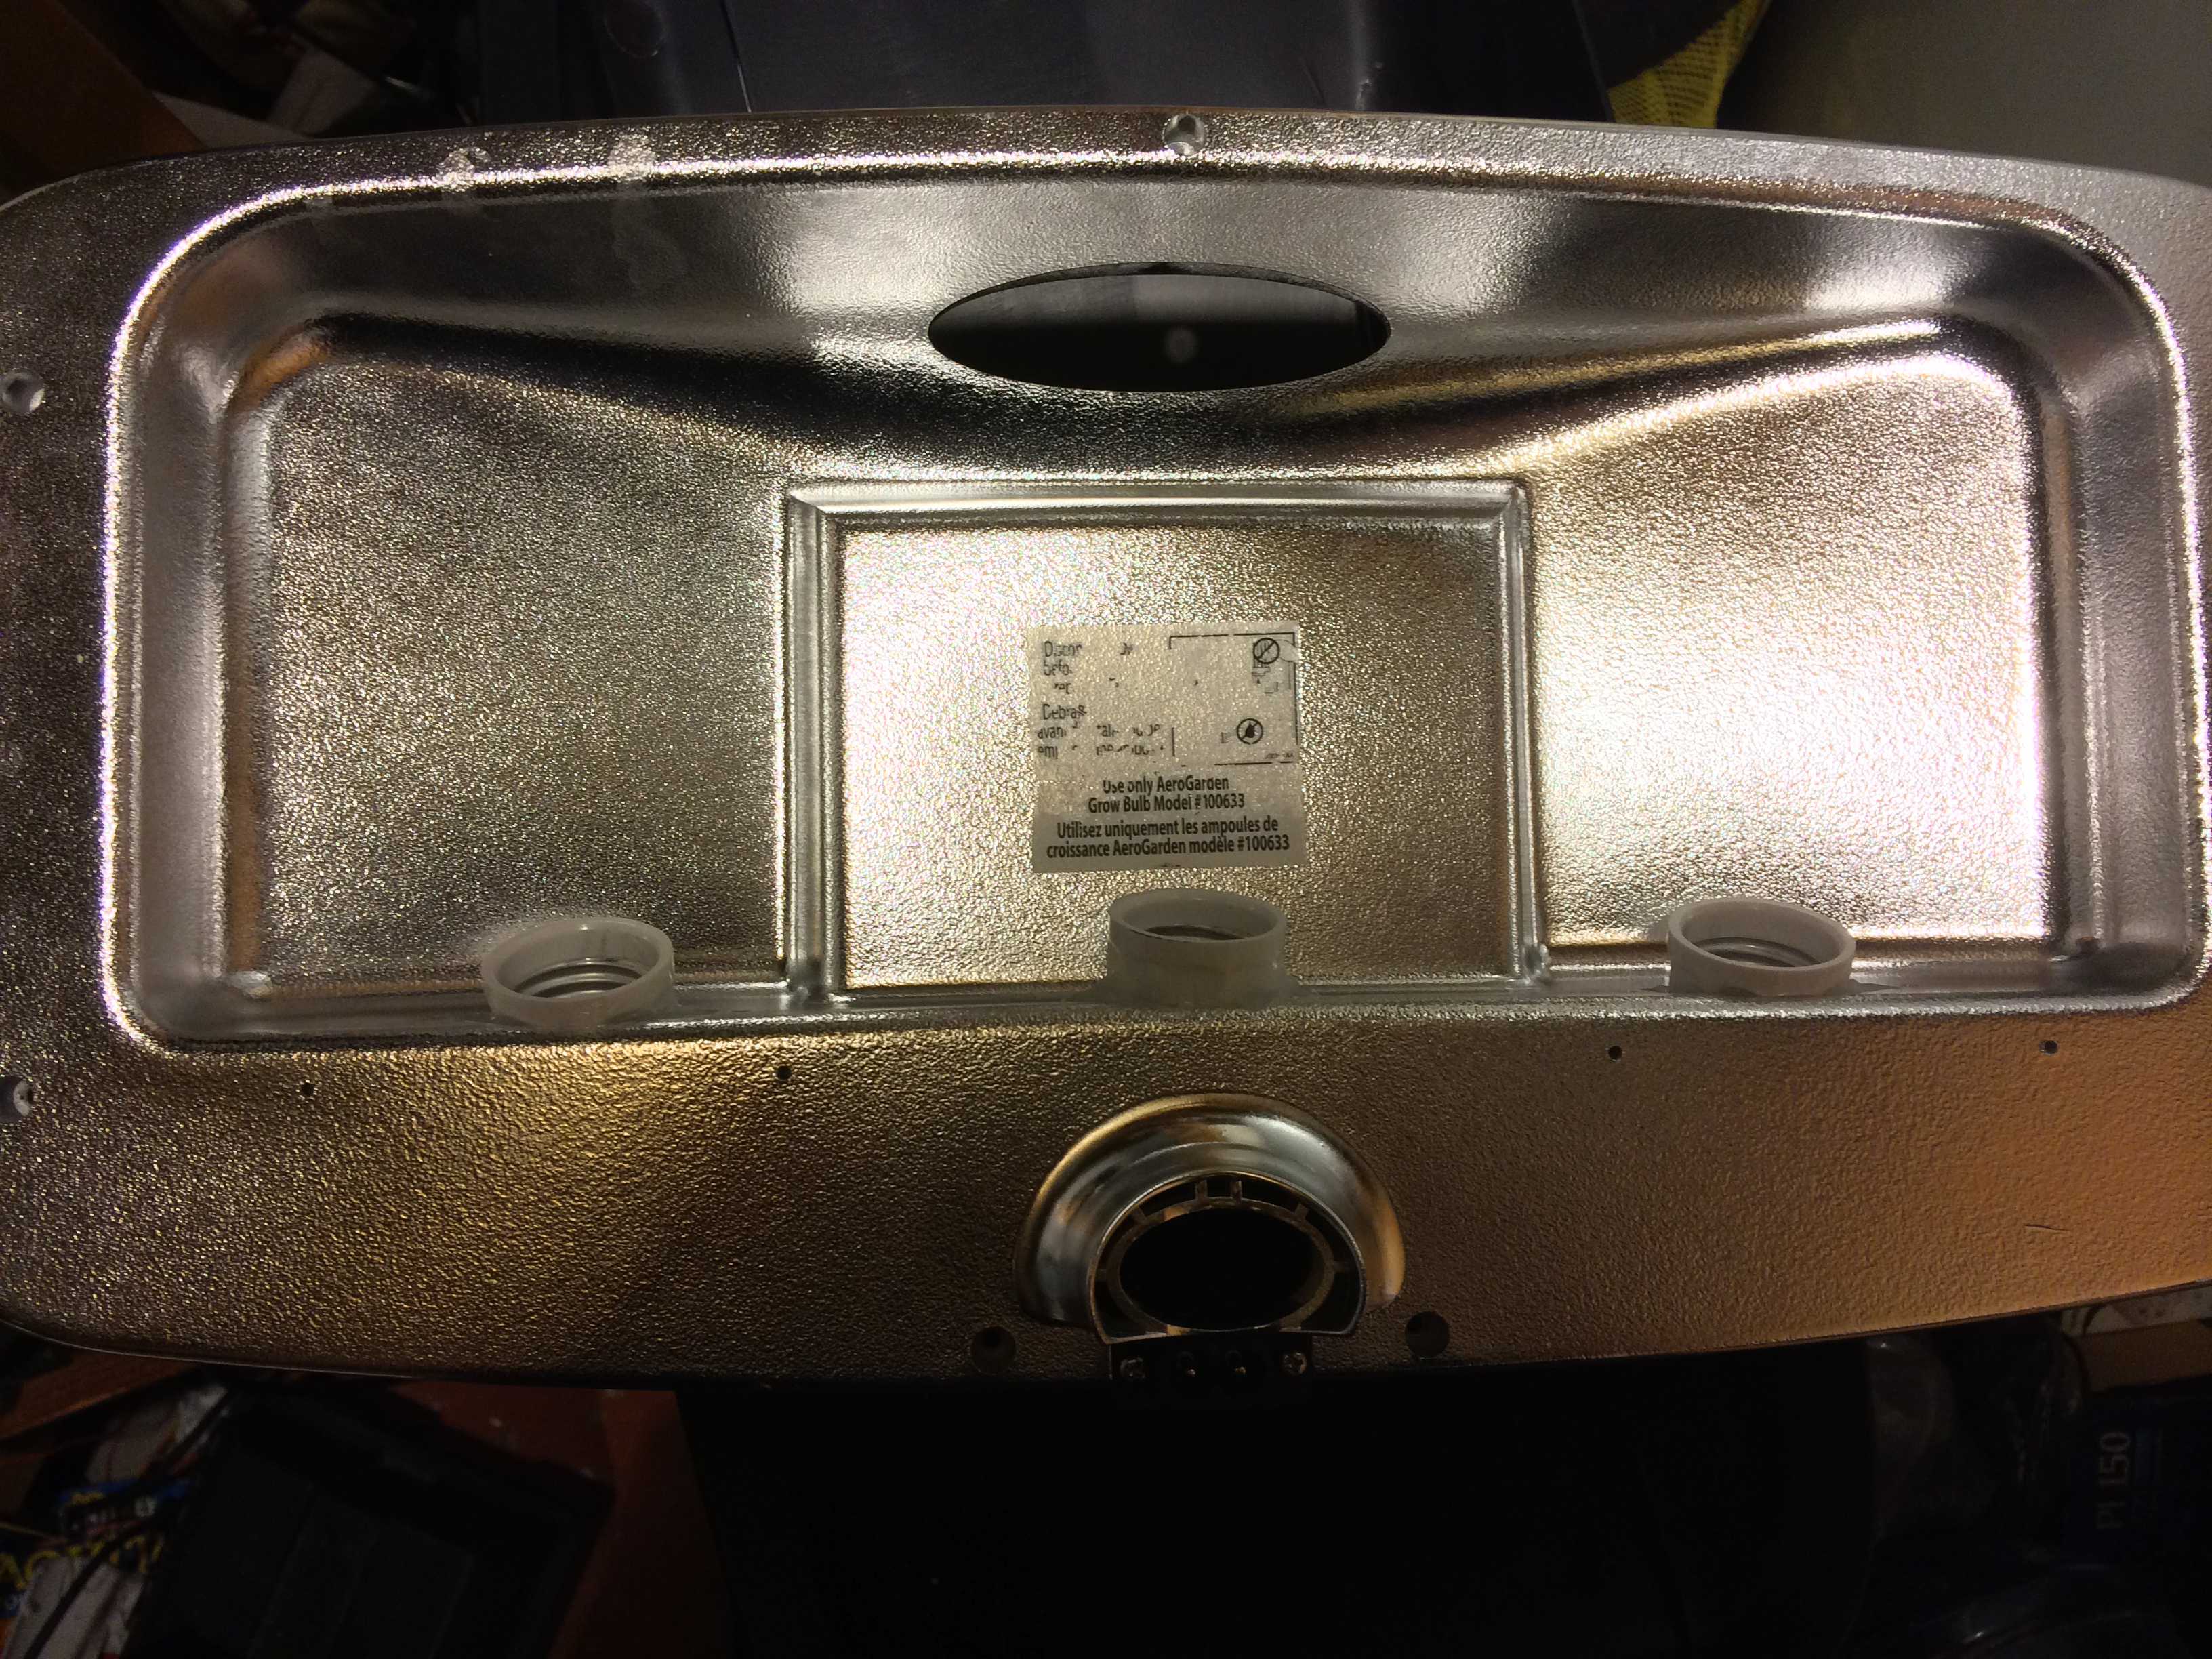
This part is pretty self-explanatory, just remove the hood from the Aerogarden's adjustable arm and remove all the screws. They are all Phillips head except for two that are tamper-proof torx head but it seems that you can still unscrew them using a regular torx bit if you put some force on them. Here's how it look like:
You could also try to break the center pin, it works on some smaller screw like the one used in Xbox 360 controller for example but I was not able to do it so easily with the one used in the Aerogarden.
Once inside, you'll notice a long circuit board wired to the lamp connector. Disconnect the wire terminal from the lamp connector, unscrew the socket from the hood and then remove them. Unscrew the circuit board and then remove it to prevent damaging it while widening the hole to fit the new light bulb. You can try to sell it on eBay or salvage the part from it for future projects as you probably won't ever need it anymore.
Now you need to widen the hole enough to fit regular light bulbs socket. Have a light bulb installed in your new socket close by to make sure it fit without touching the plastic before fixing them. Once you are sure everything is clear, you can fix the socket in place. Depending of the socket you chose, you'll either have to drill holes and screw it in place or use something like hot glue or epoxy paste. Since I was not sure if it would get hot enough to melt hot glue, I chose to use some heat resistant sealant but only because I use some cheap socket I already had lying around. I would recommend using porcelain light socket because they are more resistant to heat.
Once everything is in place and solidly fixed, you can start the wiring. You can replace the outlet plug for whatever form your country use. Also, if you plan on using 220v CFL bulb because this is the voltage used in your country, be sure to chose a relay with contact that are designed to wit stance up to 250v. You are still going to be needing a relay controlled by 120v AC as this is what the Aerogarden feed it's hood, but you are going to have over 220v AC passing through the contact of the relay so this is important to choose a relay that can handle that kind of load. But it shouldn't be too hard as most relay's contact are rated at 250v. Just double check!
You can use a relay socket like I did if you want to be able to easily replace the relay if it ever becomes defective. Plus, you can screw the wire in place and save some soldering. It fit perfectly if you position it sideways. Don't forget to fix it with some tape or hot glue before closing everything. Same goes for all the solder joints and exposed contact, do not forget to isolate everything properly with electric tape to prevent any possible short. This is 120v AC and you do not want to start a fire while you are away from home. Use shrink wrap tubing if possible or good quality isolation tape. Drill a small hole near the back of the good and pass the cable that will plug into the wall jack and try to add some of stress relief to prevent stress if the cable gets pulled. Hot glue or epoxy paste would be good enough. Alternatively, you could run the wire to the base and solder it where the Aerogarden wire connects to avoid having an extra cable on the back.
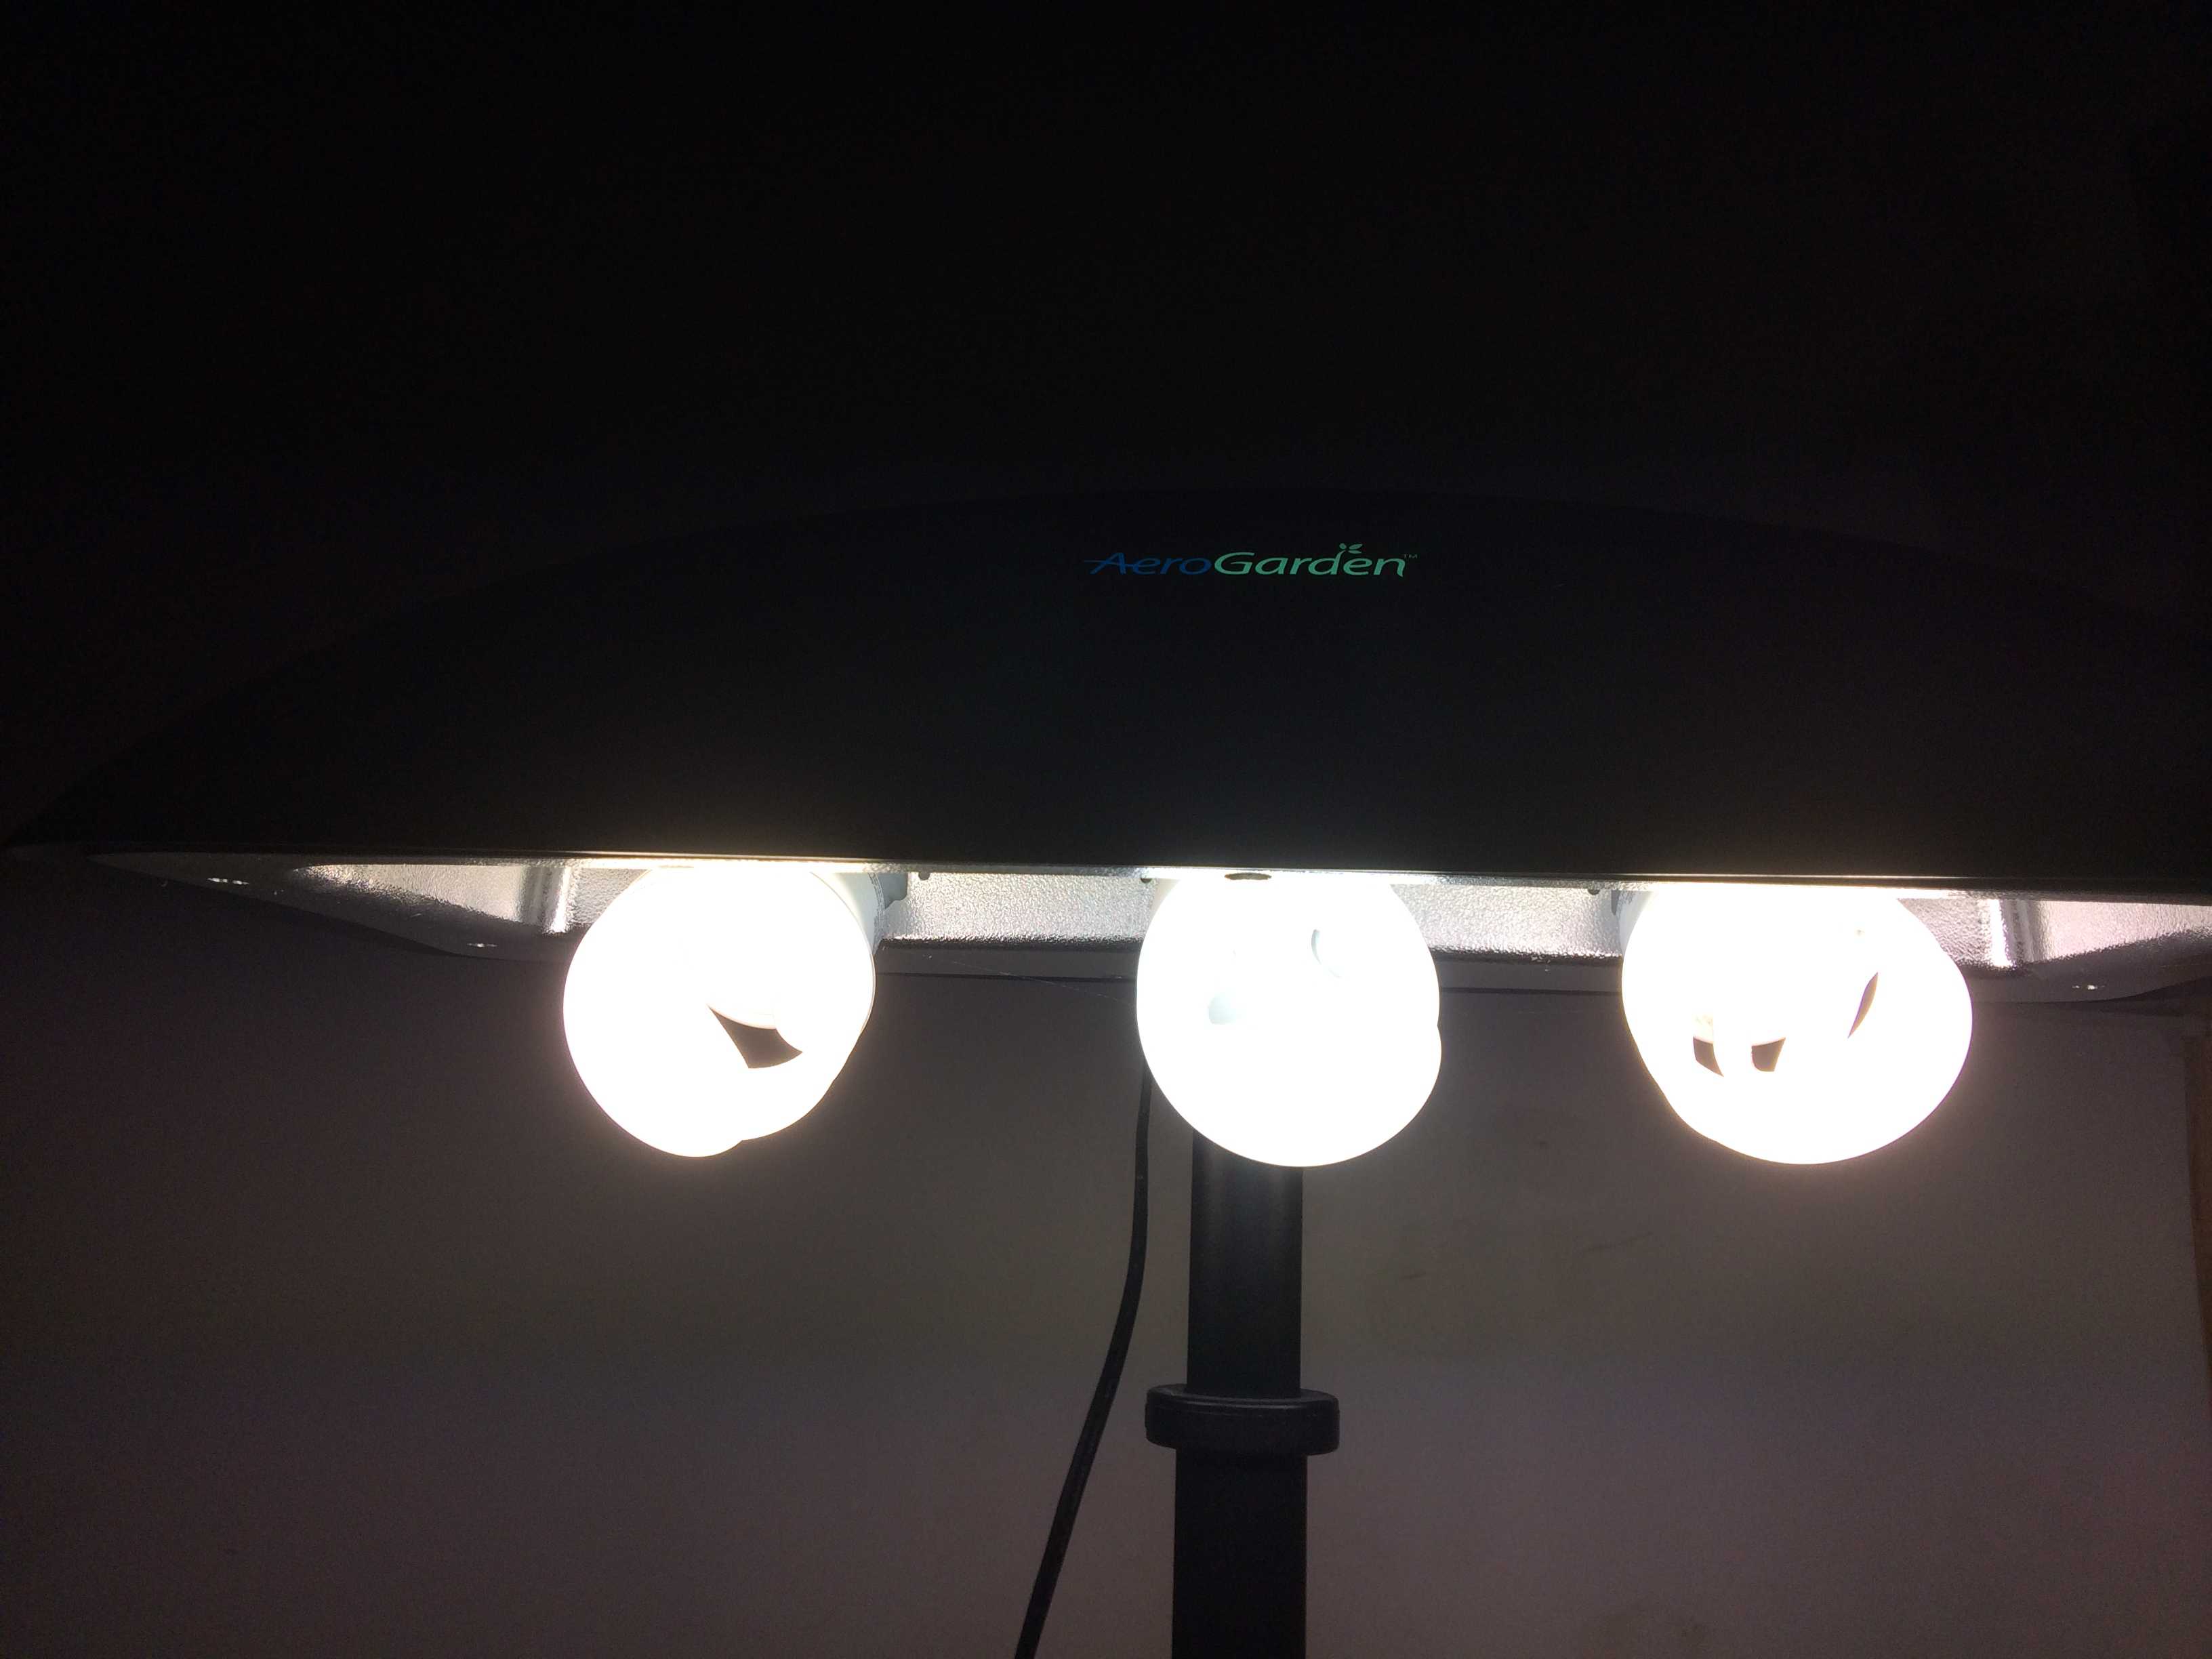
It looks a bit ghetto but everything is well insulated and work properly. I plan on redoing it more cleanly in the future and possibly take advantage of the extra NO contact in my relay to add a connector to plug external CFL bulb to add extra lighting that could be positioned around as needed. But for now it will do nicely. The Aerogarden's timer now turn on the relay at the programmed time and the relay power on the CFL bulbs. Now you won't have to keep looking for deal on proprietary light bulb and you will be able to use stronger bulb if you want to and get them locally. Be careful though and always make sure that the bulb you are installing won't heat up too much and melt the hood's plastic but from my experience it doesn't seem to be a problem with most CFL.
I am by no means an expert on lighting and plant but from what I have gathered the general concensus is that the best choice of spectrum is 65K for vegetation phase and around 27k for flowering/fruiting. You can usually find the light spectrum on the box of CFL light bulb but you can look for ''Cold White'' if you are looking for 65k and ''Warm White'' for 27k. You can also experiment mixing and matching the spectrum by using different CFL bulbs type.
Goodbye overpriced proprietary light bulb!
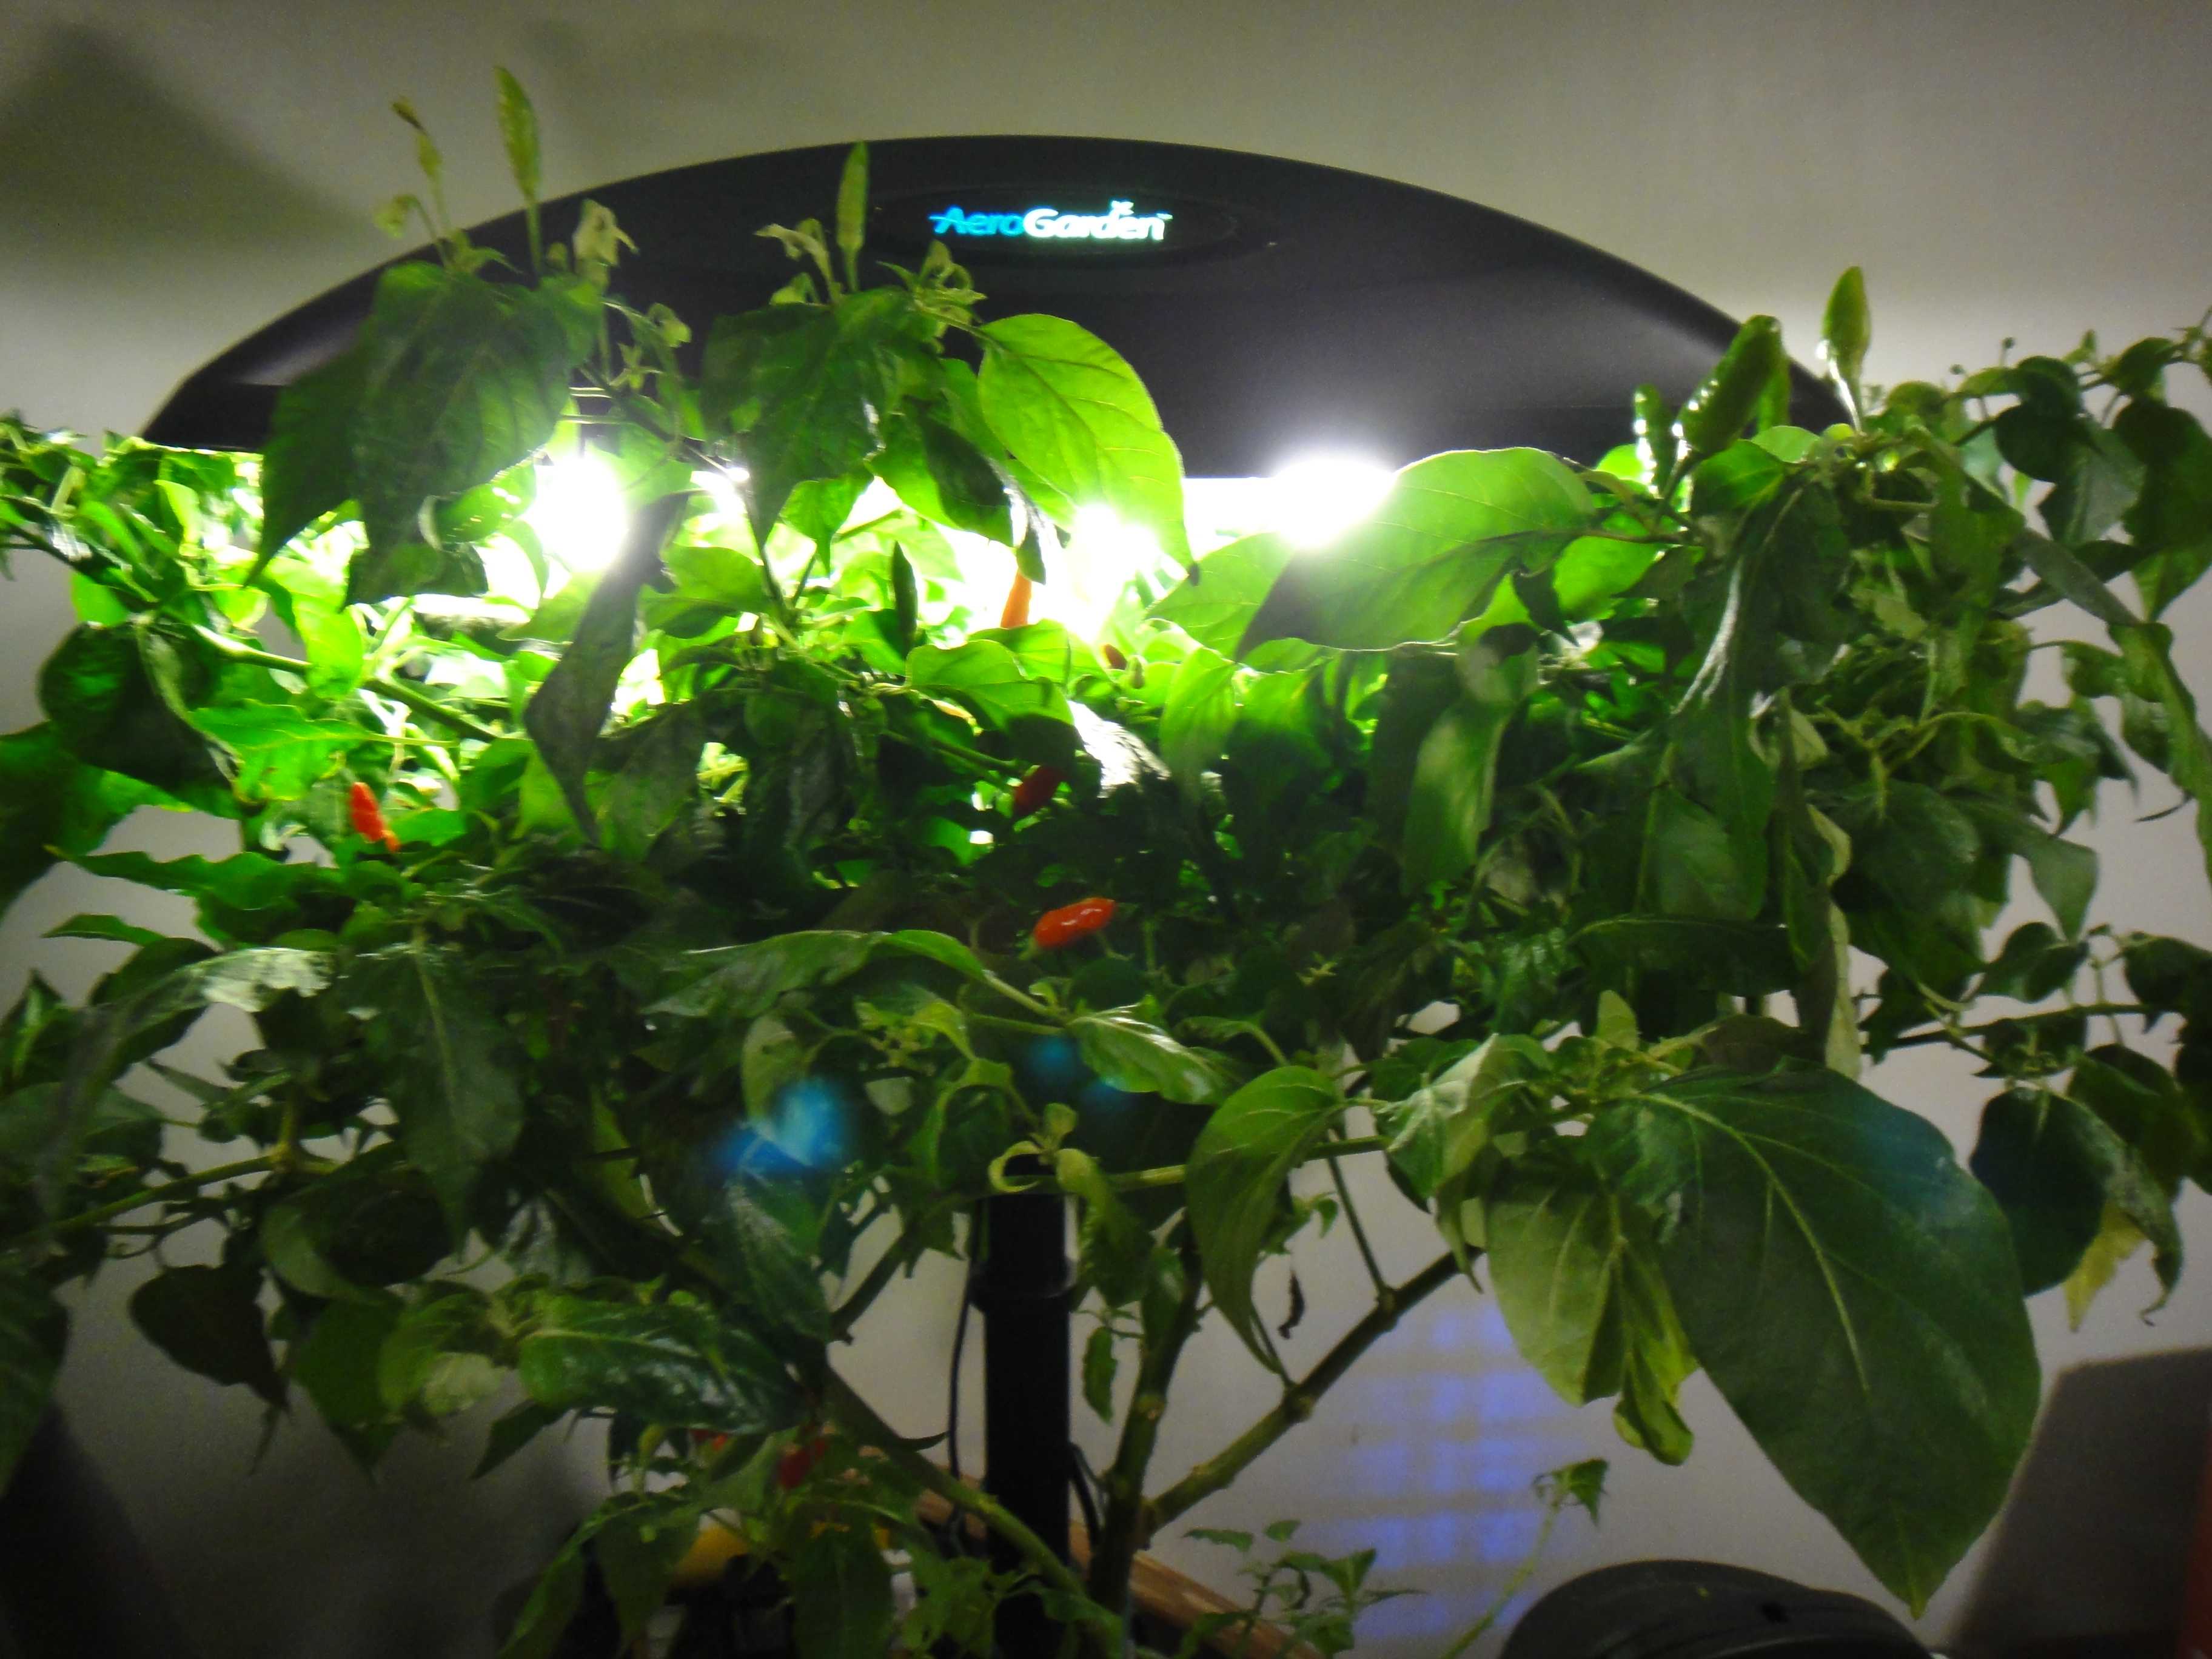
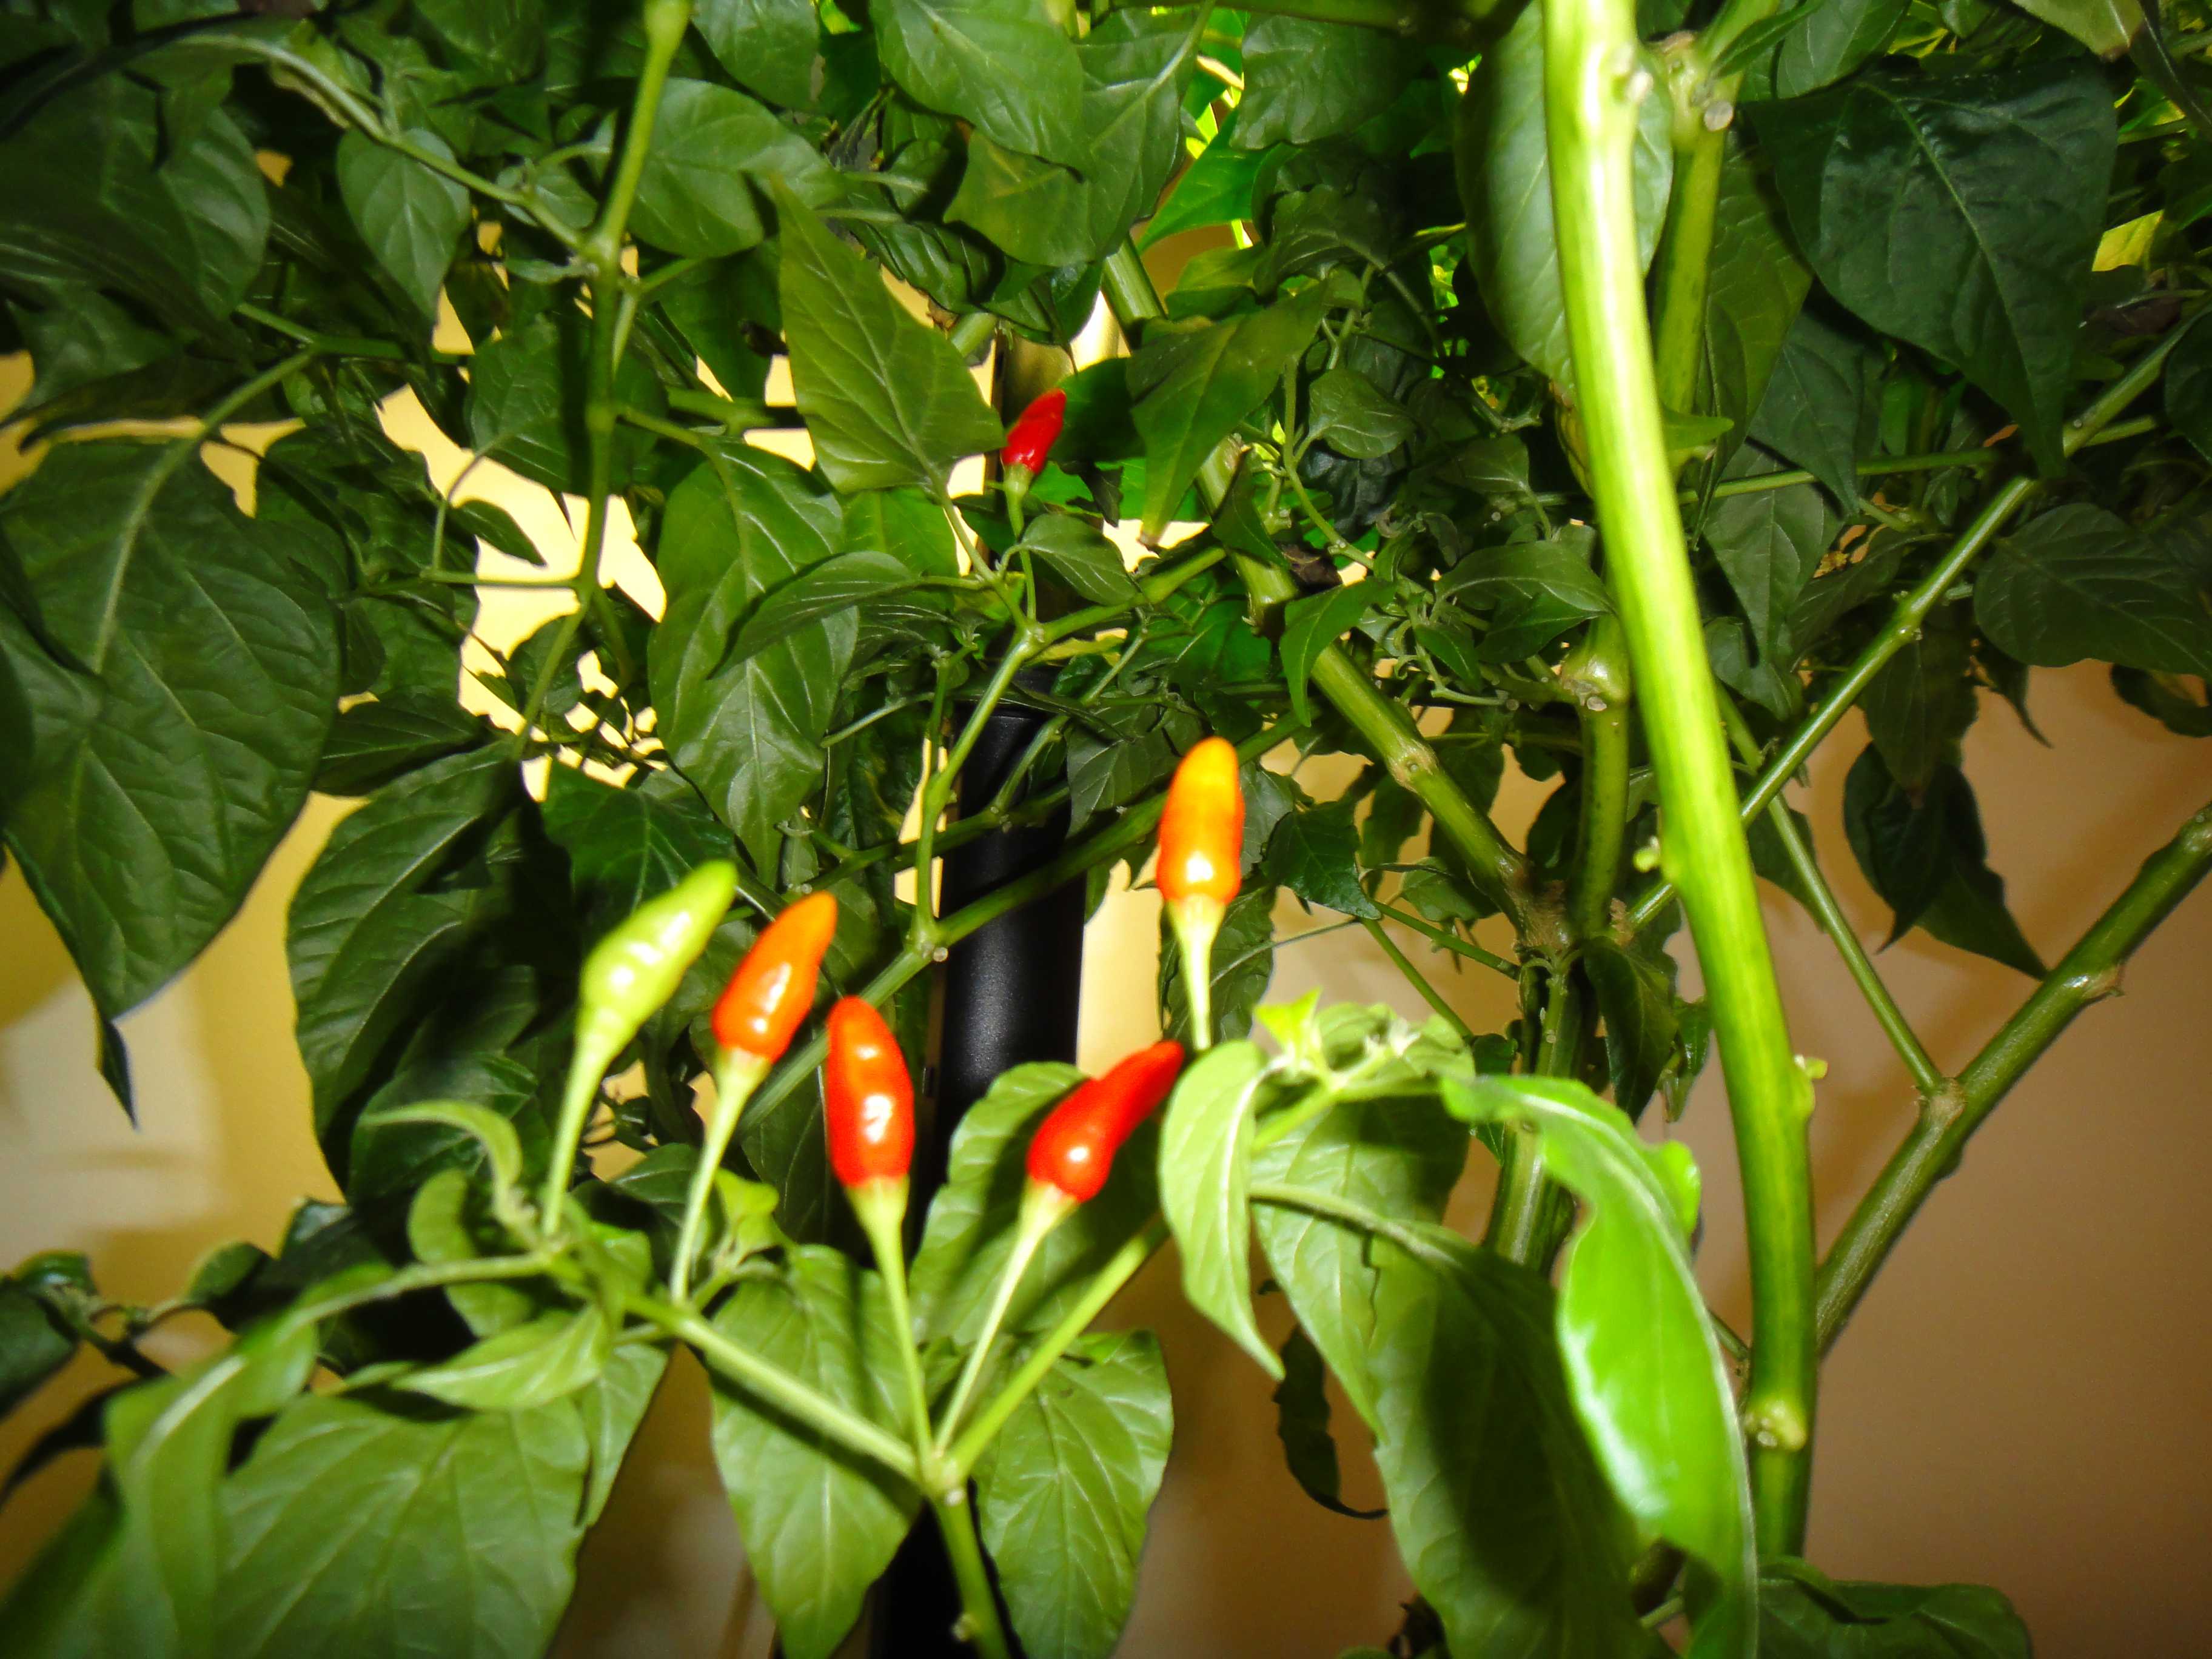
As you can see from the next pictures (taken about 7 months later), the regular cold white CFL bulbs are working quite nicely and managed to produce siling labuyo Filipino peppers. I grew that plant all the way from seed exclusively with the regular cold white CFL so there is no question that they work just as well, if not better than the proprietary Aerogarden grow lamps.
JComments ON JComments OFF Module Insert Shortcode Code Menu Contact Animate It! Article Image Page Break Read More Status Published Category * - Electronic Projects Featured Yes No Access Public Language All Tags Modification Version Note Joomla! 3.7.2 — © 2017 DBWBP.com View Site0Visitors1Administrator0MessagesLog outTwitter
(function(d, s, id) {
var js, fjs = d.getElementsByTagName(s)[0];
if (d.getElementById(id)) {return;}
js = d.createElement(s); js.id = id;
js.src = "//connect.facebook.net/en_GB/all.js#xfbml=1";
fjs.parentNode.insertBefore(js, fjs);
}(document, 'script', 'facebook-jssdk'));{lang: 'en-GB'}
I enjoy growing vegetables and especially hot peppers. I find the sheer number of different strains and their specific characteristic fascinating. Unfortunately, the growing season is somewhat short in Montréal and wanted to extend it by growing them inside during winter. My first idea was to build my own hydroponic system which wouldn't have been that hard but then I kept talking about it and my girlfriend ended up getting me an Aerogarden ultra for Christmas. At first I wasn't sure that the Aerogarden's light would be sufficient to grow hot peppers and searching on google did not bring me any confirmation that the light would be sufficient to bring fruit to maturity. I decided to try nonetheless and managed and planted some Moruga pepper from Trinidad and Tobago. It was a success and I harvested peppers for a few months until the day that my 3 Aerogarden proprietary CFL light bulb got too weak for the plants. I had bought some backup light in apprehension of that moment but to my surprised I realized that it was not the right type for this Aerogarden's model (they have 3 different types). Faced with the prospect of ordering expensive proprietary light, paying over 20$ shipping to Canada and an already dead plant, I decided it was the perfect time to modify the hood of the system to accept regular CFL light bulb. As long as you take the proper light spectrum for photosynthesis, they would perform just as well if not better than the stock one. Plus they will be cheaper and easily available anywhere locally. You'll also be able to mix and match spectrum depending of the state of vegetation of your plant if you choose to do so.
You'll need the following item to do this modification:
Light bulb socket
3
CFL Light bulb
3
120v Relay
1
Old appliance cable with plug
1
You'll also need some 16 AWG electrical wire (don't use smaller wire, it could be dangerous), electrical tape and the basic tool like screwdrivers, soldering iron and, of course, solder.
I found many forum posts and guides online to modify the Aerogarden's hood but none were for the Aerogarden Ultra so I started unscrewing the hood and checking out how I would do it. At first, I thought that it would be a matter of drilling bigger hole, fixing new sockets and wiring them to the plug but it turned out not to be as straight forward. I took some measurement and while the Aerogarden supply to the canopy was 120v, the light bulb connector was not getting 120v like I was expecting. I suppose it got to do with the lamps not having the ballast inside their bases but in the Aerogarden's hood instead to save costs. So just swapping the proprietary connector for regular light bulb socket was out of the question. Another potential issue was that the Aerogarden seem to be outputting about 90v to the hood even when the timer is off.
While it might have not created issues with the light bulbs, under powering electronics for an extended period of time is never good and probably would have reduced the life of the light bulbs. I also wanted to be able to use more powerful bulbs and I wasn't sure how much watts the Aerogarden was designed for. Connecting the new bulbs straight to a new separate power source would have obviously solved all those issue but I didn't want to have a separate timer for the new light bulb and wanted the light to go ON and OFF automatically using the Aerogarden built in timer so I decided to go with a simple electromechanical relay.
For those who are not aware of what relays are, I'll attempt to explain them simply. If you know what they are, skip ahead. Electromechanical relay are simply an assortment of NC and NO contacts (or switch if you prefer) varying from one to a dozen and an electromagnet. When the relay receives a specific current, it energizes the coil creating a magnetic field which pulls the plate to the opposite position. If the switch was NC (Normally Closed), it will open and if it was NO (Normally Open) it will close. So instead of you manually flipping a switch, they get flipped automatically when the relay detect the current it was designed for. It's very useful for any kind of automation task because you can open or close multiple separate circuits all at once without physical intervention and you can also control high voltage circuit with a very small current(micro-controller output for example). I chose to use an electromechanical relay but you could also use a solid state relay. They work in the same way but they use no moving part and do not produce the typical ''clack'' noise associated with regular electromechanical relay.
Your relay might differ from the one I am using, but the only thing that matter is whether it is controlled with 120V AC and that you have at least one NO contact.
The red part of the following picture is showing which pole of the contact are NO. This is the poles where you need to connect your wires to as it will be closing once the control voltage will be fed into your relay.
This part is pretty self-explanatory, just remove the hood from the Aerogarden's adjustable arm and remove all the screws. They are all Phillips head except for two that are tamper-proof torx head but it seems that you can still unscrew them using a regular torx bit if you put some force on them. Here's how it look like:
You could also try to break the center pin, it works on some smaller screw like the one used in Xbox 360 controller for example but I was not able to do it so easily with the one used in the Aerogarden.
Once inside, you'll notice a long circuit board wired to the lamp connector. Disconnect the wire terminal from the lamp connector, unscrew the socket from the hood and then remove them. Unscrew the circuit board and then remove it to prevent damaging it while widening the hole to fit the new light bulb. You can try to sell it on eBay or salvage the part from it for future projects as you probably won't ever need it anymore.
Now you need to widen the hole enough to fit regular light bulbs socket. Have a light bulb installed in your new socket close by to make sure it fit without touching the plastic before fixing them. Once you are sure everything is clear, you can fix the socket in place. Depending of the socket you chose, you'll either have to drill holes and screw it in place or use something like hot glue or epoxy paste. Since I was not sure if it would get hot enough to melt hot glue, I chose to use some heat resistant sealant but only because I use some cheap socket I already had lying around. I would recommend using porcelain light socket because they are more resistant to heat.
Once everything is in place and solidly fixed, you can start the wiring. You can replace the outlet plug for whatever form your country use. Also, if you plan on using 220v CFL bulb because this is the voltage used in your country, be sure to chose a relay with contact that are designed to wit stance up to 250v. You are still going to be needing a relay controlled by 120v AC as this is what the Aerogarden feed it's hood, but you are going to have over 220v AC passing through the contact of the relay so this is important to choose a relay that can handle that kind of load. But it shouldn't be too hard as most relay's contact are rated at 250v. Just double check!
You can use a relay socket like I did if you want to be able to easily replace the relay if it ever becomes defective. Plus, you can screw the wire in place and save some soldering. It fit perfectly if you position it sideways. Don't forget to fix it with some tape or hot glue before closing everything. Same goes for all the solder joints and exposed contact, do not forget to isolate everything properly with electric tape to prevent any possible short. This is 120v AC and you do not want to start a fire while you are away from home. Use shrink wrap tubing if possible or good quality isolation tape. Drill a small hole near the back of the good and pass the cable that will plug into the wall jack and try to add some of stress relief to prevent stress if the cable gets pulled. Hot glue or epoxy paste would be good enough. Alternatively, you could run the wire to the base and solder it where the Aerogarden wire connects to avoid having an extra cable on the back.
It looks a bit ghetto but everything is well insulated and work properly. I plan on redoing it more cleanly in the future and possibly take advantage of the extra NO contact in my relay to add a connector to plug external CFL bulb to add extra lighting that could be positioned around as needed. But for now it will do nicely. The Aerogarden's timer now turn on the relay at the programmed time and the relay power on the CFL bulbs. Now you won't have to keep looking for deal on proprietary light bulb and you will be able to use stronger bulb if you want to and get them locally. Be careful though and always make sure that the bulb you are installing won't heat up too much and melt the hood's plastic but from my experience it doesn't seem to be a problem with most CFL.
I am by no means an expert on lighting and plant but from what I have gathered the general concensus is that the best choice of spectrum is 65K for vegetation phase and around 27k for flowering/fruiting. You can usually find the light spectrum on the box of CFL light bulb but you can look for ''Cold White'' if you are looking for 65k and ''Warm White'' for 27k. You can also experiment mixing and matching the spectrum by using different CFL bulbs type.
Goodbye overpriced proprietary light bulb!
As you can see from the next pictures (taken about 7 months later), the regular cold white CFL bulbs are working quite nicely and managed to produce siling labuyo Filipino peppers. I grew that plant all the way from seed exclusively with the regular cold white CFL so there is no question that they work just as well, if not better than the proprietary Aerogarden grow lamps.
JComments ON JComments OFF Module Insert Shortcode Code Menu Contact Animate It! Article Image Page Break Read More Status Published Category * - Electronic Projects Featured Yes No Access Public Language All Tags Modification Version Note Joomla! 3.7.2 — © 2017 DBWBP.com View Site0Visitors1Administrator0MessagesLog outTwitter
(function(d, s, id) {
var js, fjs = d.getElementsByTagName(s)[0];
if (d.getElementById(id)) {return;}
js = d.createElement(s); js.id = id;
js.src = "//connect.facebook.net/en_GB/all.js#xfbml=1";
fjs.parentNode.insertBefore(js, fjs);
}(document, 'script', 'facebook-jssdk'));{lang: 'en-GB'}
60 out of
100 with
1 ratings
I enjoy growing vegetables and especially hot peppers. I find the sheer number of different strains and their specific characteristic fascinating. Unfortunately, the growing season is somewhat short in Montréal and wanted to extend it by growing them inside during winter. My first idea was to build my own hydroponic system which wouldn't have been that hard but then I kept talking about it and my girlfriend ended up getting me an Aerogarden ultra for Christmas. At first I wasn't sure that the Aerogarden's light would be sufficient to grow hot peppers and searching on google did not bring me any confirmation that the light would be sufficient to bring fruit to maturity. I decided to try nonetheless and managed and planted some Moruga pepper from Trinidad and Tobago. It was a success and I harvested peppers for a few months until the day that my 3 Aerogarden proprietary CFL light bulb got too weak for the plants. I had bought some backup light in apprehension of that moment but to my surprised I realized that it was not the right type for this Aerogarden's model (they have 3 different types). Faced with the prospect of ordering expensive proprietary light, paying over 20$ shipping to Canada and an already dead plant, I decided it was the perfect time to modify the hood of the system to accept regular CFL light bulb. As long as you take the proper light spectrum for photosynthesis, they would perform just as well if not better than the stock one. Plus they will be cheaper and easily available anywhere locally. You'll also be able to mix and match spectrum depending of the state of vegetation of your plant if you choose to do so.
You'll need the following item to do this modification:
| Light bulb socket |
3 |
| CFL Light bulb |
3 |
| 120v Relay |
1 |
| Old appliance cable with plug |
1 |
You'll also need some 16 AWG electrical wire (don't use smaller wire, it could be dangerous), electrical tape and the basic tool like screwdrivers, soldering iron and, of course, solder.
I found many forum posts and guides online to modify the Aerogarden's hood but none were for the Aerogarden Ultra so I started unscrewing the hood and checking out how I would do it. At first, I thought that it would be a matter of drilling bigger hole, fixing new sockets and wiring them to the plug but it turned out not to be as straight forward. I took some measurement and while the Aerogarden supply to the canopy was 120v, the light bulb connector was not getting 120v like I was expecting. I suppose it got to do with the lamps not having the ballast inside their bases but in the Aerogarden's hood instead to save costs. So just swapping the proprietary connector for regular light bulb socket was out of the question. Another potential issue was that the Aerogarden seem to be outputting about 90v to the hood even when the timer is off.

While it might have not created issues with the light bulbs, under powering electronics for an extended period of time is never good and probably would have reduced the life of the light bulbs. I also wanted to be able to use more powerful bulbs and I wasn't sure how much watts the Aerogarden was designed for. Connecting the new bulbs straight to a new separate power source would have obviously solved all those issue but I didn't want to have a separate timer for the new light bulb and wanted the light to go ON and OFF automatically using the Aerogarden built in timer so I decided to go with a simple electromechanical relay.
For those who are not aware of what relays are, I'll attempt to explain them simply. If you know what they are, skip ahead. Electromechanical relay are simply an assortment of NC and NO contacts (or switch if you prefer) varying from one to a dozen and an electromagnet. When the relay receives a specific current, it energizes the coil creating a magnetic field which pulls the plate to the opposite position. If the switch was NC (Normally Closed), it will open and if it was NO (Normally Open) it will close. So instead of you manually flipping a switch, they get flipped automatically when the relay detect the current it was designed for. It's very useful for any kind of automation task because you can open or close multiple separate circuits all at once without physical intervention and you can also control high voltage circuit with a very small current(micro-controller output for example). I chose to use an electromechanical relay but you could also use a solid state relay. They work in the same way but they use no moving part and do not produce the typical ''clack'' noise associated with regular electromechanical relay.
Your relay might differ from the one I am using, but the only thing that matter is whether it is controlled with 120V AC and that you have at least one NO contact.
The red part of the following picture is showing which pole of the contact are NO. This is the poles where you need to connect your wires to as it will be closing once the control voltage will be fed into your relay.
This part is pretty self-explanatory, just remove the hood from the Aerogarden's adjustable arm and remove all the screws. They are all Phillips head except for two that are tamper-proof torx head but it seems that you can still unscrew them using a regular torx bit if you put some force on them. Here's how it look like:

You could also try to break the center pin, it works on some smaller screw like the one used in Xbox 360 controller for example but I was not able to do it so easily with the one used in the Aerogarden.
Once inside, you'll notice a long circuit board wired to the lamp connector. Disconnect the wire terminal from the lamp connector, unscrew the socket from the hood and then remove them. Unscrew the circuit board and then remove it to prevent damaging it while widening the hole to fit the new light bulb. You can try to sell it on eBay or salvage the part from it for future projects as you probably won't ever need it anymore.
Now you need to widen the hole enough to fit regular light bulbs socket. Have a light bulb installed in your new socket close by to make sure it fit without touching the plastic before fixing them. Once you are sure everything is clear, you can fix the socket in place. Depending of the socket you chose, you'll either have to drill holes and screw it in place or use something like hot glue or epoxy paste. Since I was not sure if it would get hot enough to melt hot glue, I chose to use some heat resistant sealant but only because I use some cheap socket I already had lying around. I would recommend using porcelain light socket because they are more resistant to heat.
Once everything is in place and solidly fixed, you can start the wiring. You can replace the outlet plug for whatever form your country use. Also, if you plan on using 220v CFL bulb because this is the voltage used in your country, be sure to chose a relay with contact that are designed to wit stance up to 250v. You are still going to be needing a relay controlled by 120v AC as this is what the Aerogarden feed it's hood, but you are going to have over 220v AC passing through the contact of the relay so this is important to choose a relay that can handle that kind of load. But it shouldn't be too hard as most relay's contact are rated at 250v. Just double check!

You can use a relay socket like I did if you want to be able to easily replace the relay if it ever becomes defective. Plus, you can screw the wire in place and save some soldering. It fit perfectly if you position it sideways. Don't forget to fix it with some tape or hot glue before closing everything. Same goes for all the solder joints and exposed contact, do not forget to isolate everything properly with electric tape to prevent any possible short. This is 120v AC and you do not want to start a fire while you are away from home. Use shrink wrap tubing if possible or good quality isolation tape. Drill a small hole near the back of the good and pass the cable that will plug into the wall jack and try to add some of stress relief to prevent stress if the cable gets pulled. Hot glue or epoxy paste would be good enough. Alternatively, you could run the wire to the base and solder it where the Aerogarden wire connects to avoid having an extra cable on the back.
It looks a bit ghetto but everything is well insulated and work properly. I plan on redoing it more cleanly in the future and possibly take advantage of the extra NO contact in my relay to add a connector to plug external CFL bulb to add extra lighting that could be positioned around as needed. But for now it will do nicely. The Aerogarden's timer now turn on the relay at the programmed time and the relay power on the CFL bulbs. Now you won't have to keep looking for deal on proprietary light bulb and you will be able to use stronger bulb if you want to and get them locally. Be careful though and always make sure that the bulb you are installing won't heat up too much and melt the hood's plastic but from my experience it doesn't seem to be a problem with most CFL.
I am by no means an expert on lighting and plant but from what I have gathered the general concensus is that the best choice of spectrum is 65K for vegetation phase and around 27k for flowering/fruiting. You can usually find the light spectrum on the box of CFL light bulb but you can look for ''Cold White'' if you are looking for 65k and ''Warm White'' for 27k. You can also experiment mixing and matching the spectrum by using different CFL bulbs type.
Goodbye overpriced proprietary light bulb!
As you can see from the next pictures (taken about 7 months later), the regular cold white CFL bulbs are working quite nicely and managed to produce siling labuyo Filipino peppers. I grew that plant all the way from seed exclusively with the regular cold white CFL so there is no question that they work just as well, if not better than the proprietary Aerogarden grow lamps.
JComments ON JComments OFF Module Insert Shortcode Code Menu Contact Animate It! Article Image Page Break Read More Status Published Category * - Electronic Projects Featured Yes No Access Public Language All Tags Modification Version Note Joomla! 3.7.2 — © 2017 DBWBP.com View Site0Visitors1Administrator0MessagesLog out