Upgrading RAM in SNES carts
Upgrading RAM in SNES carts
In the past, I was in need of a SNES cart PCB supporting 64k of RAM but only had one with 16k. This is how I solved my dilemma using existing scrap parts I had laying around as opposed to destroy another game.
The reason why I was in need of a 64k SRAM SNES PCB is that I was asked by someone whether I could make a reproduction of Zelda: A Link to the Past. I was understandably very confused by that request as Zelda is a very cheap and common game. Why would someone ask for such a thing? Turn out that this person was into making speedrun and needed version 1.0 of A Link to the Past in order to exploit some version's specific glitches/bug in the game that were fixed in later revision of the game. Since there is no physical indication on the cart as to which revision you are getting, he kept buying carts on eBay hoping to find a v1.0 but always ended up with version 1.1. I normally wouldn't grant a request of reproducing a released game (not fan translated) as this would be putting bootleg into circulation but I agreed to help out considering his goal and the fact that this is a common game with no money to be made re-selling it. Now, making a reproduction of such a simple cart would be a straight up affair but I didn't really want to destroy a cart if I didn't have to. I had a SHVC-1A1M-01 PCB from a Stanley Cup cart laying around that I kept just in after I took it's shell to house my SD2SNES. Only trouble was that there was not enough RAM on board for ALTTP. The board only had 16k of RAM while Zelda require 64k. The obvious solution would have been to just take a PCB with enough RAM from another crap sport game but where is the fun in that? Plus, I do not like wasting thing that could still be used. Since the guy assured me it was just to do some speedruns, he didn't care about getting just the bare PCB without cart shell as it would also cost less to ship in that state. And since I also dislike wasting thing that could be put to use it was a win-win.
This RAM upgrade could also be useful if you had a PCB you wished to use as a dev cart and you needed more RAM than available.
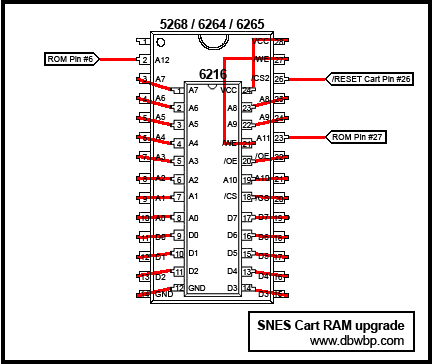
So, first thing first, we need to figure out which chip we're going to use. I had some 6264 on hand so this is what I chose to use but those instruction should work for any other DIP 64k RAM chip like 6265, 5268 etc... They pretty much all use the standard pin-out. Now the main issue with replacing our 16k RAM with a 64k version is that the 16k chip only has 24 pin while the 64k IC use 28 pins because of the extra address line. We need to find a way to connect those extra address like they would be on a SNES PCB using that amount of RAM. But before doing that we need to figure the difference in pin-out between our old 16K RAM chip and our new 64K one. The RAM used on this particular board was a 6218 but it should be the same for any other 16k ram you might find in a SNES cart. Looking at the datasheet for the 6216 and the one for 6264, we can see that 98% of the pin-out line up between the two. There is only 2 pins that are swapped beside the extra address line that are completely absent on the 6216. Figuring where to wire up the missing A11, A12 and /CS2 on the board is a simple matter of looking at the SNES cart and MASKROM pin-out or poking around a board using 64k RAM with the continuity tester of a multi-meter.
Start by de-soldering the old RAM chip. You can use de-soldering wick and a solder sucker to achieve this. While this method will ensure that the chip will be removed without being damaged, it is a total pain in the neck to do and take a long while. If you are not planning of ever using that old RAM chip, you can cut the leg with a fine wire cutter and de-solder the remain of the pin separately. Once you have removed the old RAM and cleaned out the pin-hole, solder a wire to the pin hole of pin #21 and pin #24, this will make it easier for later. Then take your new 64k RAM chip, carefully lift pin #1-2-23-26-27-28 and insert it where the old IC was located making sure that pin #3 of your new chip line up with pin #1 of the old chip. Once you are sure that everything is lined up properly and that the wire you soldered earlier are going to be accessible, solder the chip in place.
All that is left to do now is rewire the pin we have lifted according to the following wiring diagram.
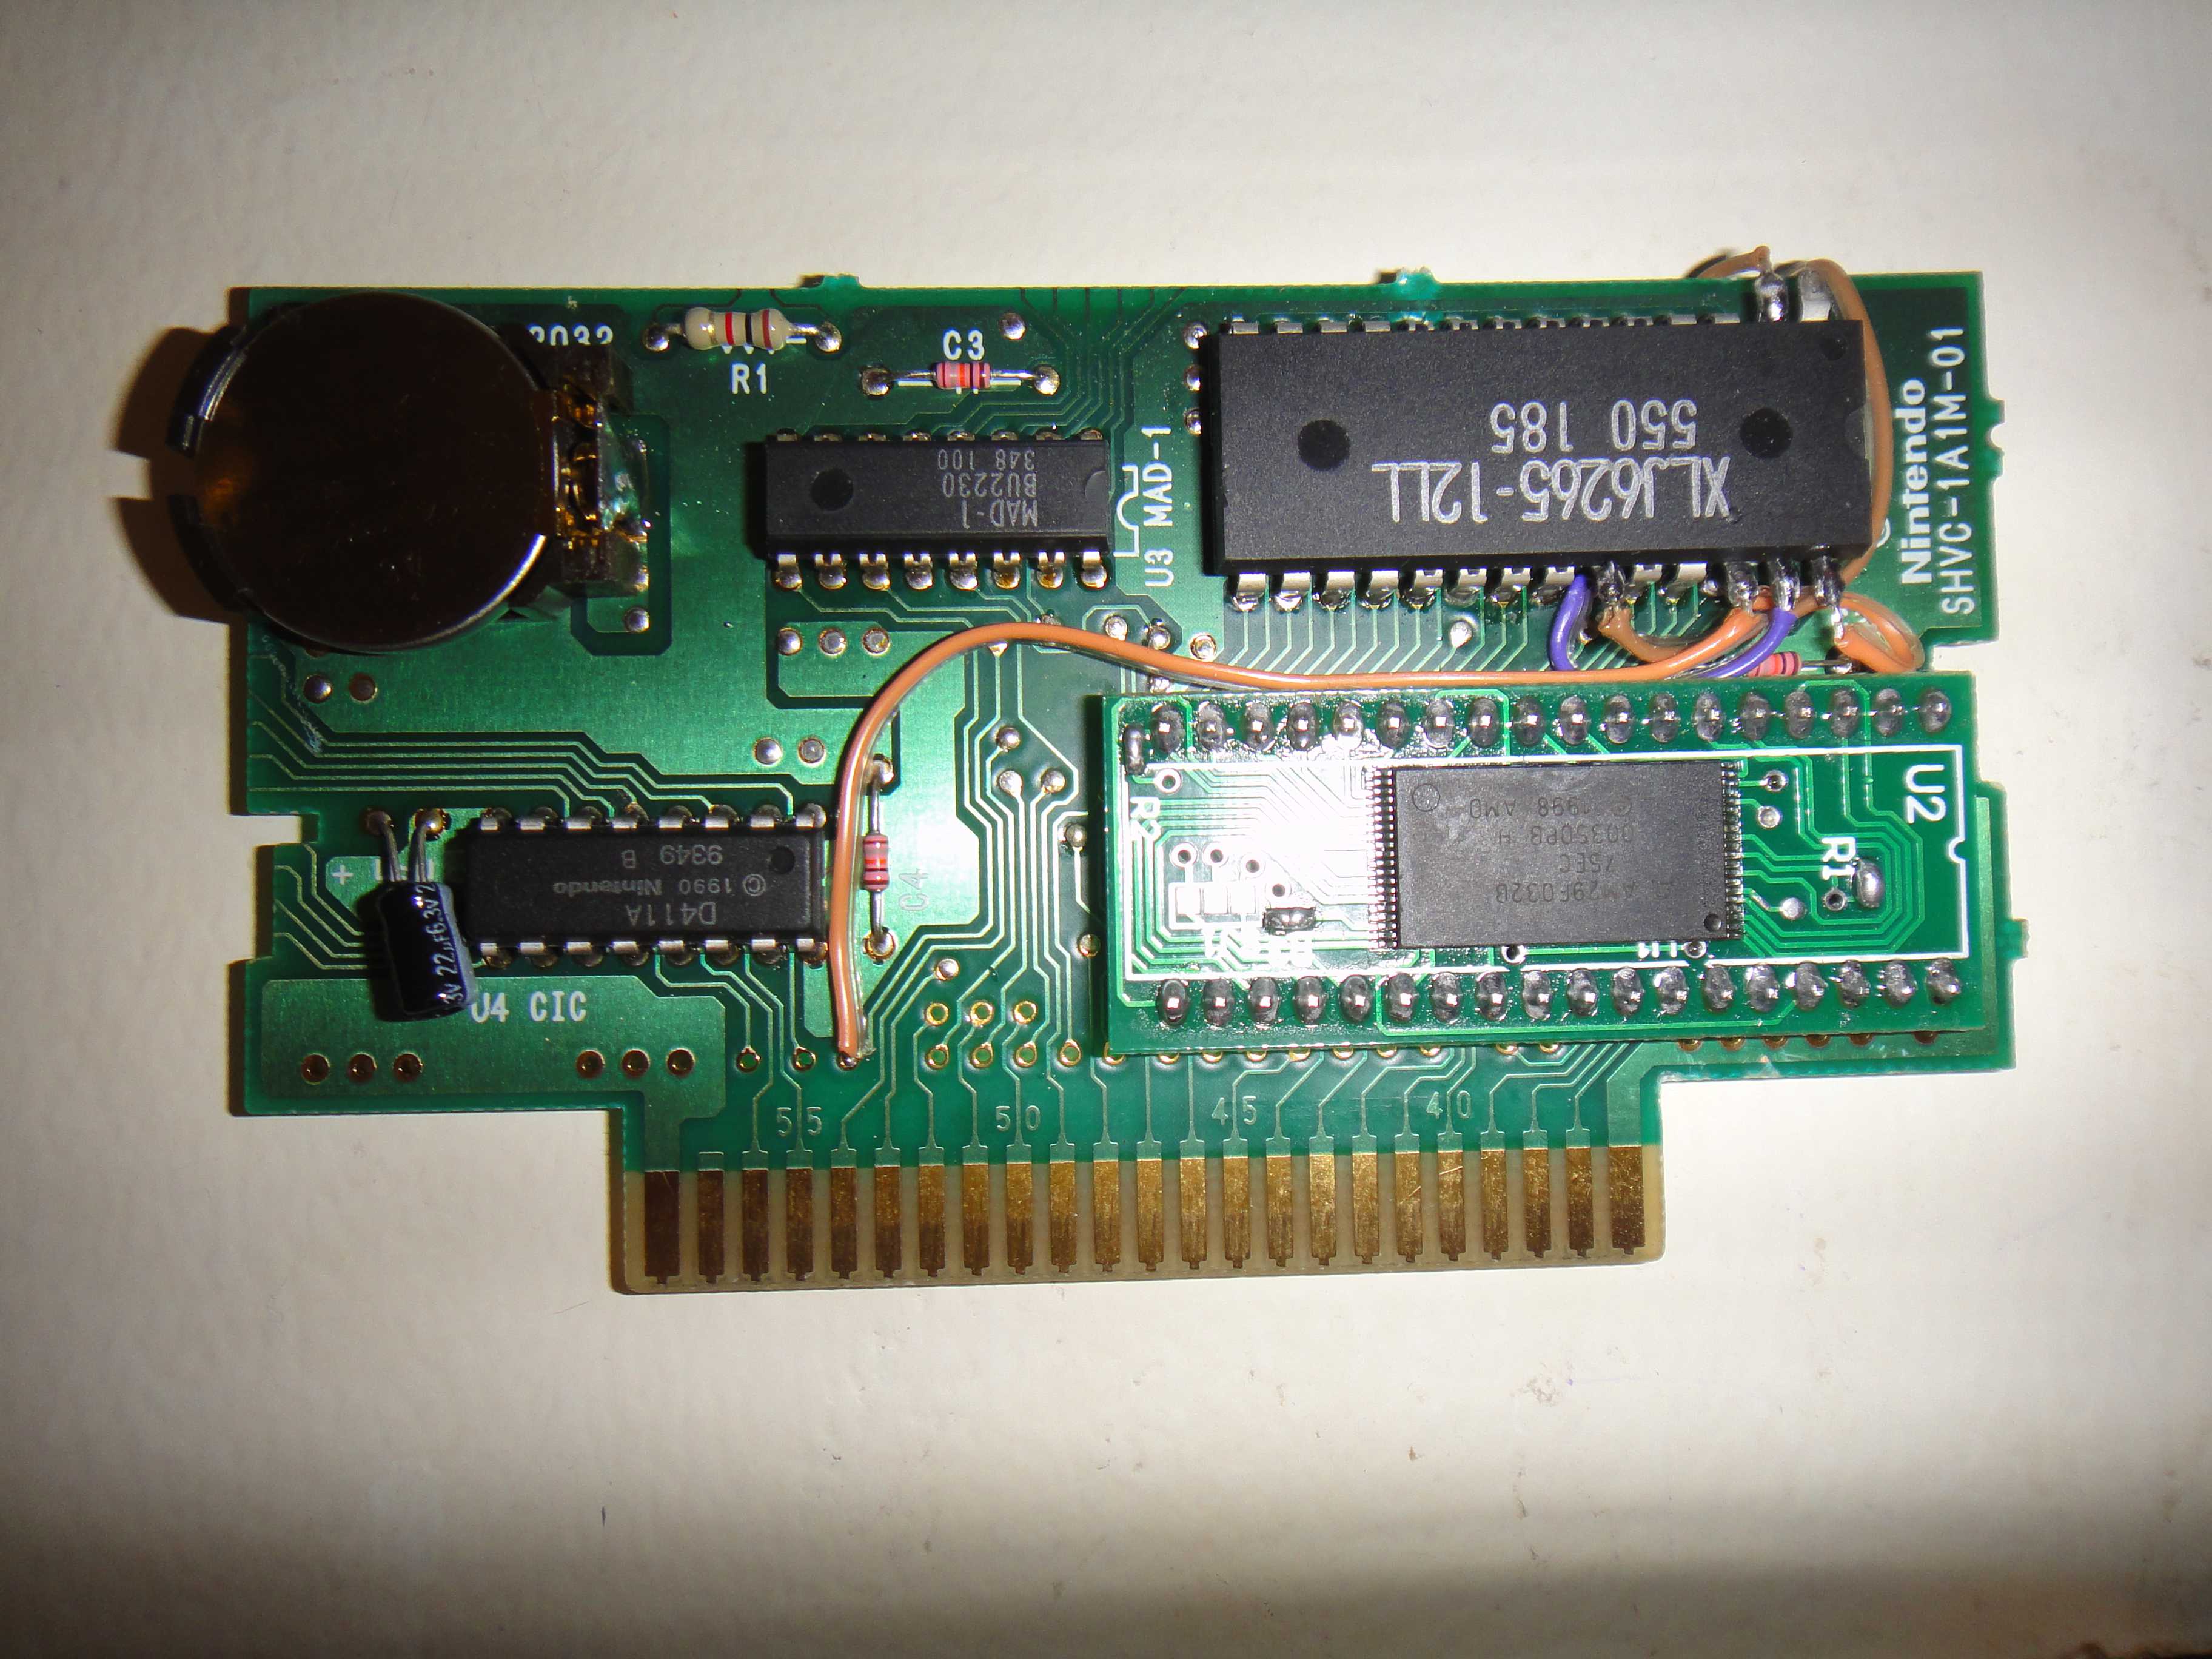
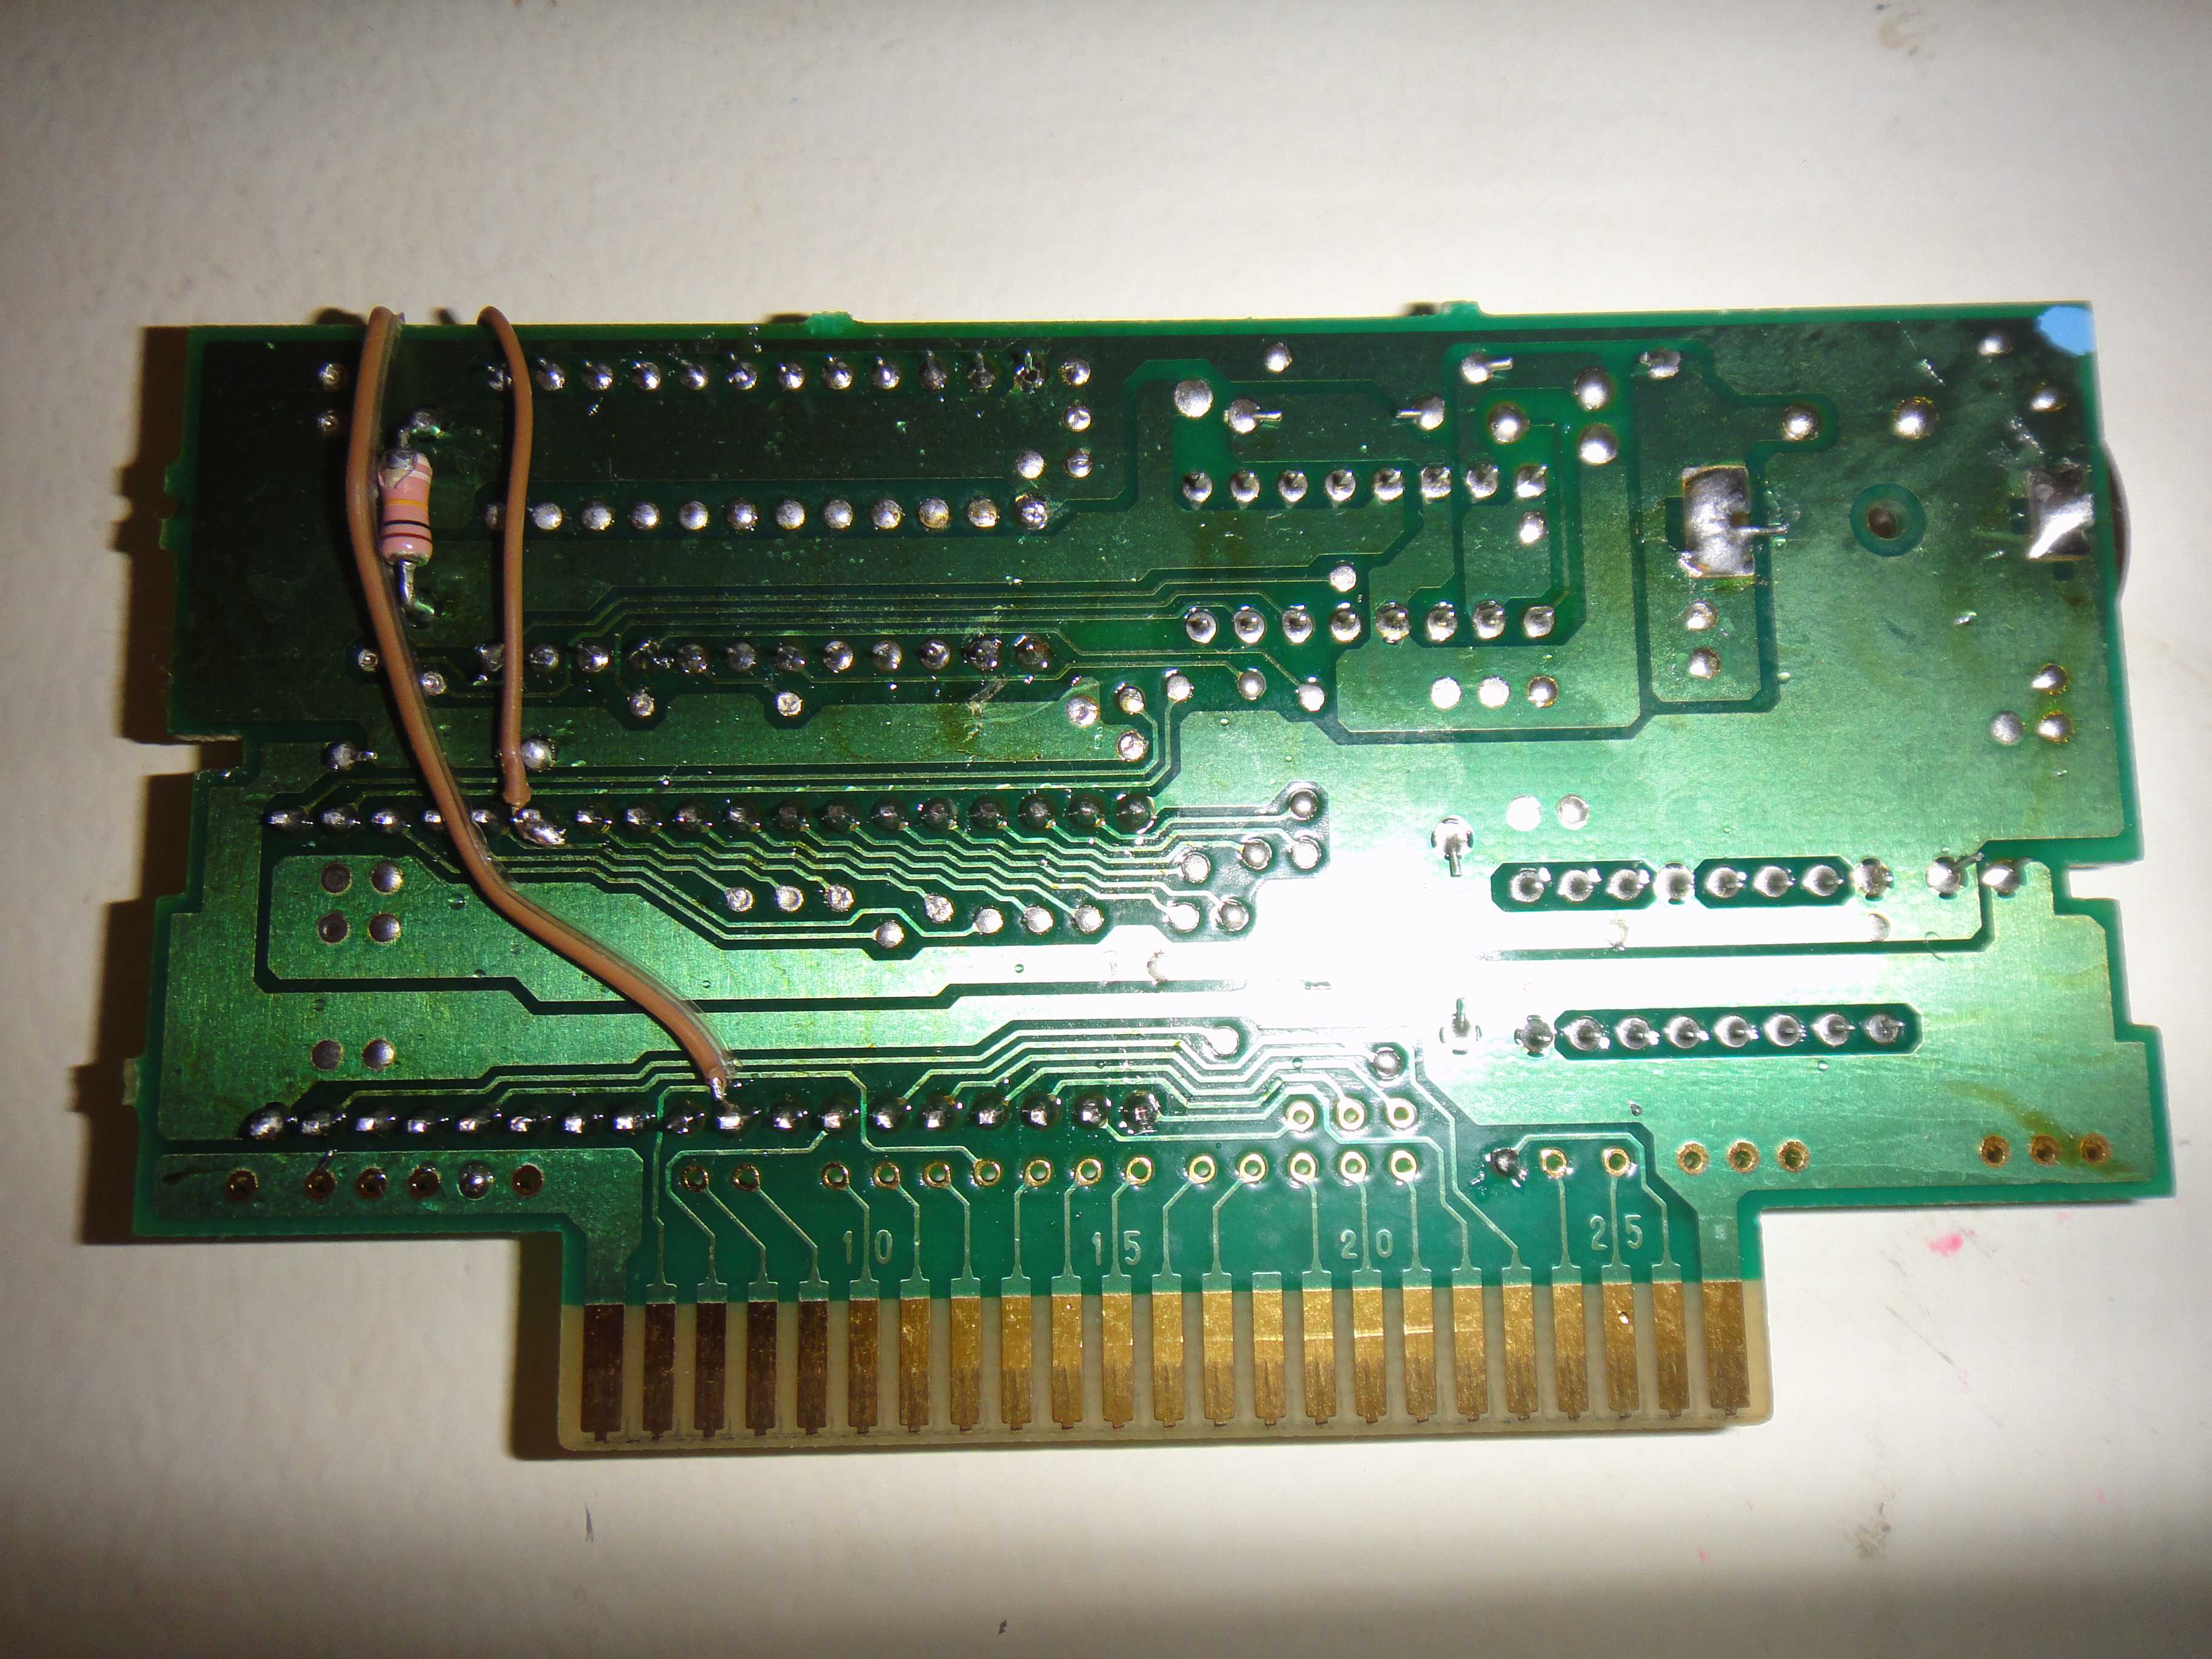
When you are done, you should end up with something that look like this
You can see that I also added a battery holder to make replacing the CR2032 battery easier in the future. And yes, I am fully aware that using a 29F032 flash chip for a small game like ALTTP is a waste of space, but that's all I had on hand and didn't have time to order some smaller size chip. You can test your extra RAM by flashing a game than 16k of RAM and trying to save to all the available slot, turning off the console for 30 second or so and turning it back on to check if all the data is still there.
Twitter
(function(d, s, id) {
var js, fjs = d.getElementsByTagName(s)[0];
if (d.getElementById(id)) {return;}
js = d.createElement(s); js.id = id;
js.src = "//connect.facebook.net/en_GB/all.js#xfbml=1";
fjs.parentNode.insertBefore(js, fjs);
}(document, 'script', 'facebook-jssdk'));{lang: 'en-GB'}
In the past, I was in need of a SNES cart PCB supporting 64k of RAM but only had one with 16k. This is how I solved my dilemma using existing scrap parts I had laying around as opposed to destroy another game.
The reason why I was in need of a 64k SRAM SNES PCB is that I was asked by someone whether I could make a reproduction of Zelda: A Link to the Past. I was understandably very confused by that request as Zelda is a very cheap and common game. Why would someone ask for such a thing? Turn out that this person was into making speedrun and needed version 1.0 of A Link to the Past in order to exploit some version's specific glitches/bug in the game that were fixed in later revision of the game. Since there is no physical indication on the cart as to which revision you are getting, he kept buying carts on eBay hoping to find a v1.0 but always ended up with version 1.1. I normally wouldn't grant a request of reproducing a released game (not fan translated) as this would be putting bootleg into circulation but I agreed to help out considering his goal and the fact that this is a common game with no money to be made re-selling it. Now, making a reproduction of such a simple cart would be a straight up affair but I didn't really want to destroy a cart if I didn't have to. I had a SHVC-1A1M-01 PCB from a Stanley Cup cart laying around that I kept just in after I took it's shell to house my SD2SNES. Only trouble was that there was not enough RAM on board for ALTTP. The board only had 16k of RAM while Zelda require 64k. The obvious solution would have been to just take a PCB with enough RAM from another crap sport game but where is the fun in that? Plus, I do not like wasting thing that could still be used. Since the guy assured me it was just to do some speedruns, he didn't care about getting just the bare PCB without cart shell as it would also cost less to ship in that state. And since I also dislike wasting thing that could be put to use it was a win-win.
This RAM upgrade could also be useful if you had a PCB you wished to use as a dev cart and you needed more RAM than available.
So, first thing first, we need to figure out which chip we're going to use. I had some 6264 on hand so this is what I chose to use but those instruction should work for any other DIP 64k RAM chip like 6265, 5268 etc... They pretty much all use the standard pin-out. Now the main issue with replacing our 16k RAM with a 64k version is that the 16k chip only has 24 pin while the 64k IC use 28 pins because of the extra address line. We need to find a way to connect those extra address like they would be on a SNES PCB using that amount of RAM. But before doing that we need to figure the difference in pin-out between our old 16K RAM chip and our new 64K one. The RAM used on this particular board was a 6218 but it should be the same for any other 16k ram you might find in a SNES cart. Looking at the datasheet for the 6216 and the one for 6264, we can see that 98% of the pin-out line up between the two. There is only 2 pins that are swapped beside the extra address line that are completely absent on the 6216. Figuring where to wire up the missing A11, A12 and /CS2 on the board is a simple matter of looking at the SNES cart and MASKROM pin-out or poking around a board using 64k RAM with the continuity tester of a multi-meter.
Start by de-soldering the old RAM chip. You can use de-soldering wick and a solder sucker to achieve this. While this method will ensure that the chip will be removed without being damaged, it is a total pain in the neck to do and take a long while. If you are not planning of ever using that old RAM chip, you can cut the leg with a fine wire cutter and de-solder the remain of the pin separately. Once you have removed the old RAM and cleaned out the pin-hole, solder a wire to the pin hole of pin #21 and pin #24, this will make it easier for later. Then take your new 64k RAM chip, carefully lift pin #1-2-23-26-27-28 and insert it where the old IC was located making sure that pin #3 of your new chip line up with pin #1 of the old chip. Once you are sure that everything is lined up properly and that the wire you soldered earlier are going to be accessible, solder the chip in place.
All that is left to do now is rewire the pin we have lifted according to the following wiring diagram.
When you are done, you should end up with something that look like this
You can see that I also added a battery holder to make replacing the CR2032 battery easier in the future. And yes, I am fully aware that using a 29F032 flash chip for a small game like ALTTP is a waste of space, but that's all I had on hand and didn't have time to order some smaller size chip. You can test your extra RAM by flashing a game than 16k of RAM and trying to save to all the available slot, turning off the console for 30 second or so and turning it back on to check if all the data is still there.
Twitter
(function(d, s, id) {
var js, fjs = d.getElementsByTagName(s)[0];
if (d.getElementById(id)) {return;}
js = d.createElement(s); js.id = id;
js.src = "//connect.facebook.net/en_GB/all.js#xfbml=1";
fjs.parentNode.insertBefore(js, fjs);
}(document, 'script', 'facebook-jssdk'));{lang: 'en-GB'}
40 out of
100 with
1 ratings
In the past, I was in need of a SNES cart PCB supporting 64k of RAM but only had one with 16k. This is how I solved my dilemma using existing scrap parts I had laying around as opposed to destroy another game.
The reason why I was in need of a 64k SRAM SNES PCB is that I was asked by someone whether I could make a reproduction of Zelda: A Link to the Past. I was understandably very confused by that request as Zelda is a very cheap and common game. Why would someone ask for such a thing? Turn out that this person was into making speedrun and needed version 1.0 of A Link to the Past in order to exploit some version's specific glitches/bug in the game that were fixed in later revision of the game. Since there is no physical indication on the cart as to which revision you are getting, he kept buying carts on eBay hoping to find a v1.0 but always ended up with version 1.1. I normally wouldn't grant a request of reproducing a released game (not fan translated) as this would be putting bootleg into circulation but I agreed to help out considering his goal and the fact that this is a common game with no money to be made re-selling it. Now, making a reproduction of such a simple cart would be a straight up affair but I didn't really want to destroy a cart if I didn't have to. I had a SHVC-1A1M-01 PCB from a Stanley Cup cart laying around that I kept just in after I took it's shell to house my SD2SNES. Only trouble was that there was not enough RAM on board for ALTTP. The board only had 16k of RAM while Zelda require 64k. The obvious solution would have been to just take a PCB with enough RAM from another crap sport game but where is the fun in that? Plus, I do not like wasting thing that could still be used. Since the guy assured me it was just to do some speedruns, he didn't care about getting just the bare PCB without cart shell as it would also cost less to ship in that state. And since I also dislike wasting thing that could be put to use it was a win-win.
This RAM upgrade could also be useful if you had a PCB you wished to use as a dev cart and you needed more RAM than available.
So, first thing first, we need to figure out which chip we're going to use. I had some 6264 on hand so this is what I chose to use but those instruction should work for any other DIP 64k RAM chip like 6265, 5268 etc... They pretty much all use the standard pin-out. Now the main issue with replacing our 16k RAM with a 64k version is that the 16k chip only has 24 pin while the 64k IC use 28 pins because of the extra address line. We need to find a way to connect those extra address like they would be on a SNES PCB using that amount of RAM. But before doing that we need to figure the difference in pin-out between our old 16K RAM chip and our new 64K one. The RAM used on this particular board was a 6218 but it should be the same for any other 16k ram you might find in a SNES cart. Looking at the datasheet for the 6216 and the one for 6264, we can see that 98% of the pin-out line up between the two. There is only 2 pins that are swapped beside the extra address line that are completely absent on the 6216. Figuring where to wire up the missing A11, A12 and /CS2 on the board is a simple matter of looking at the SNES cart and MASKROM pin-out or poking around a board using 64k RAM with the continuity tester of a multi-meter.
Start by de-soldering the old RAM chip. You can use de-soldering wick and a solder sucker to achieve this. While this method will ensure that the chip will be removed without being damaged, it is a total pain in the neck to do and take a long while. If you are not planning of ever using that old RAM chip, you can cut the leg with a fine wire cutter and de-solder the remain of the pin separately. Once you have removed the old RAM and cleaned out the pin-hole, solder a wire to the pin hole of pin #21 and pin #24, this will make it easier for later. Then take your new 64k RAM chip, carefully lift pin #1-2-23-26-27-28 and insert it where the old IC was located making sure that pin #3 of your new chip line up with pin #1 of the old chip. Once you are sure that everything is lined up properly and that the wire you soldered earlier are going to be accessible, solder the chip in place.
All that is left to do now is rewire the pin we have lifted according to the following wiring diagram.
When you are done, you should end up with something that look like this
You can see that I also added a battery holder to make replacing the CR2032 battery easier in the future. And yes, I am fully aware that using a 29F032 flash chip for a small game like ALTTP is a waste of space, but that's all I had on hand and didn't have time to order some smaller size chip. You can test your extra RAM by flashing a game than 16k of RAM and trying to save to all the available slot, turning off the console for 30 second or so and turning it back on to check if all the data is still there.